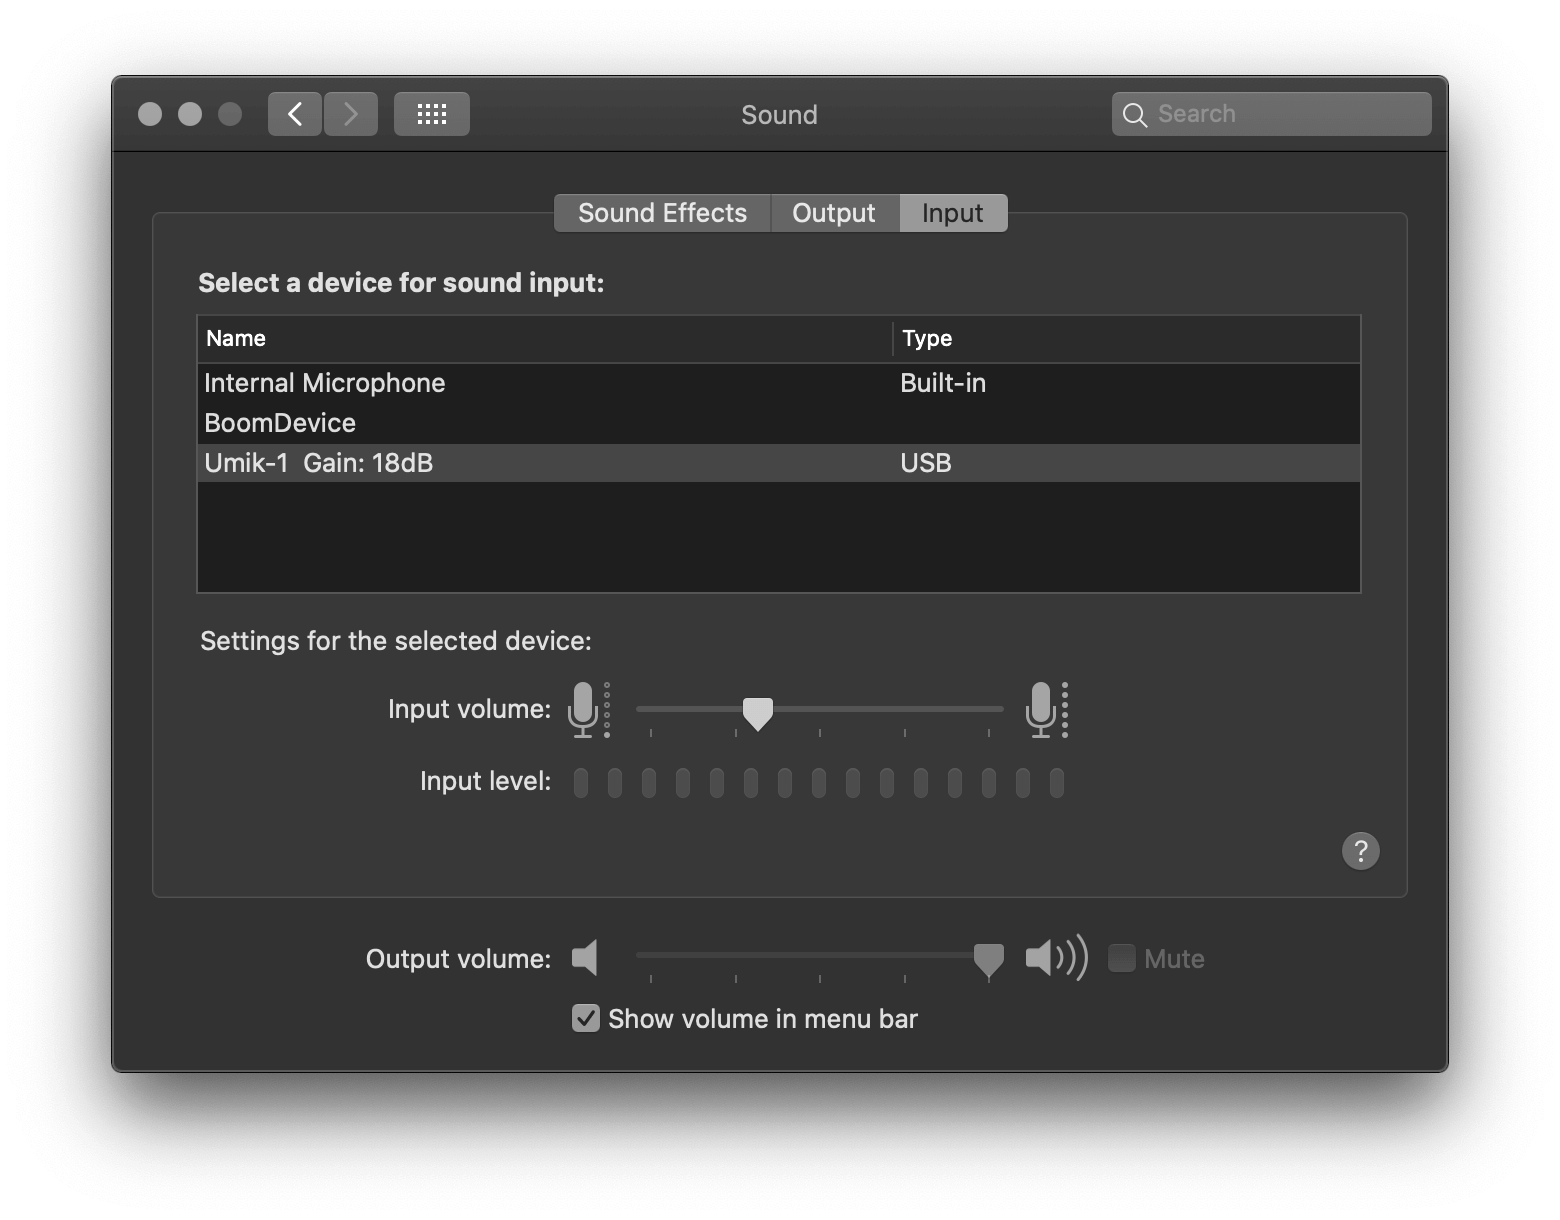
System Preferences > Sound > Input
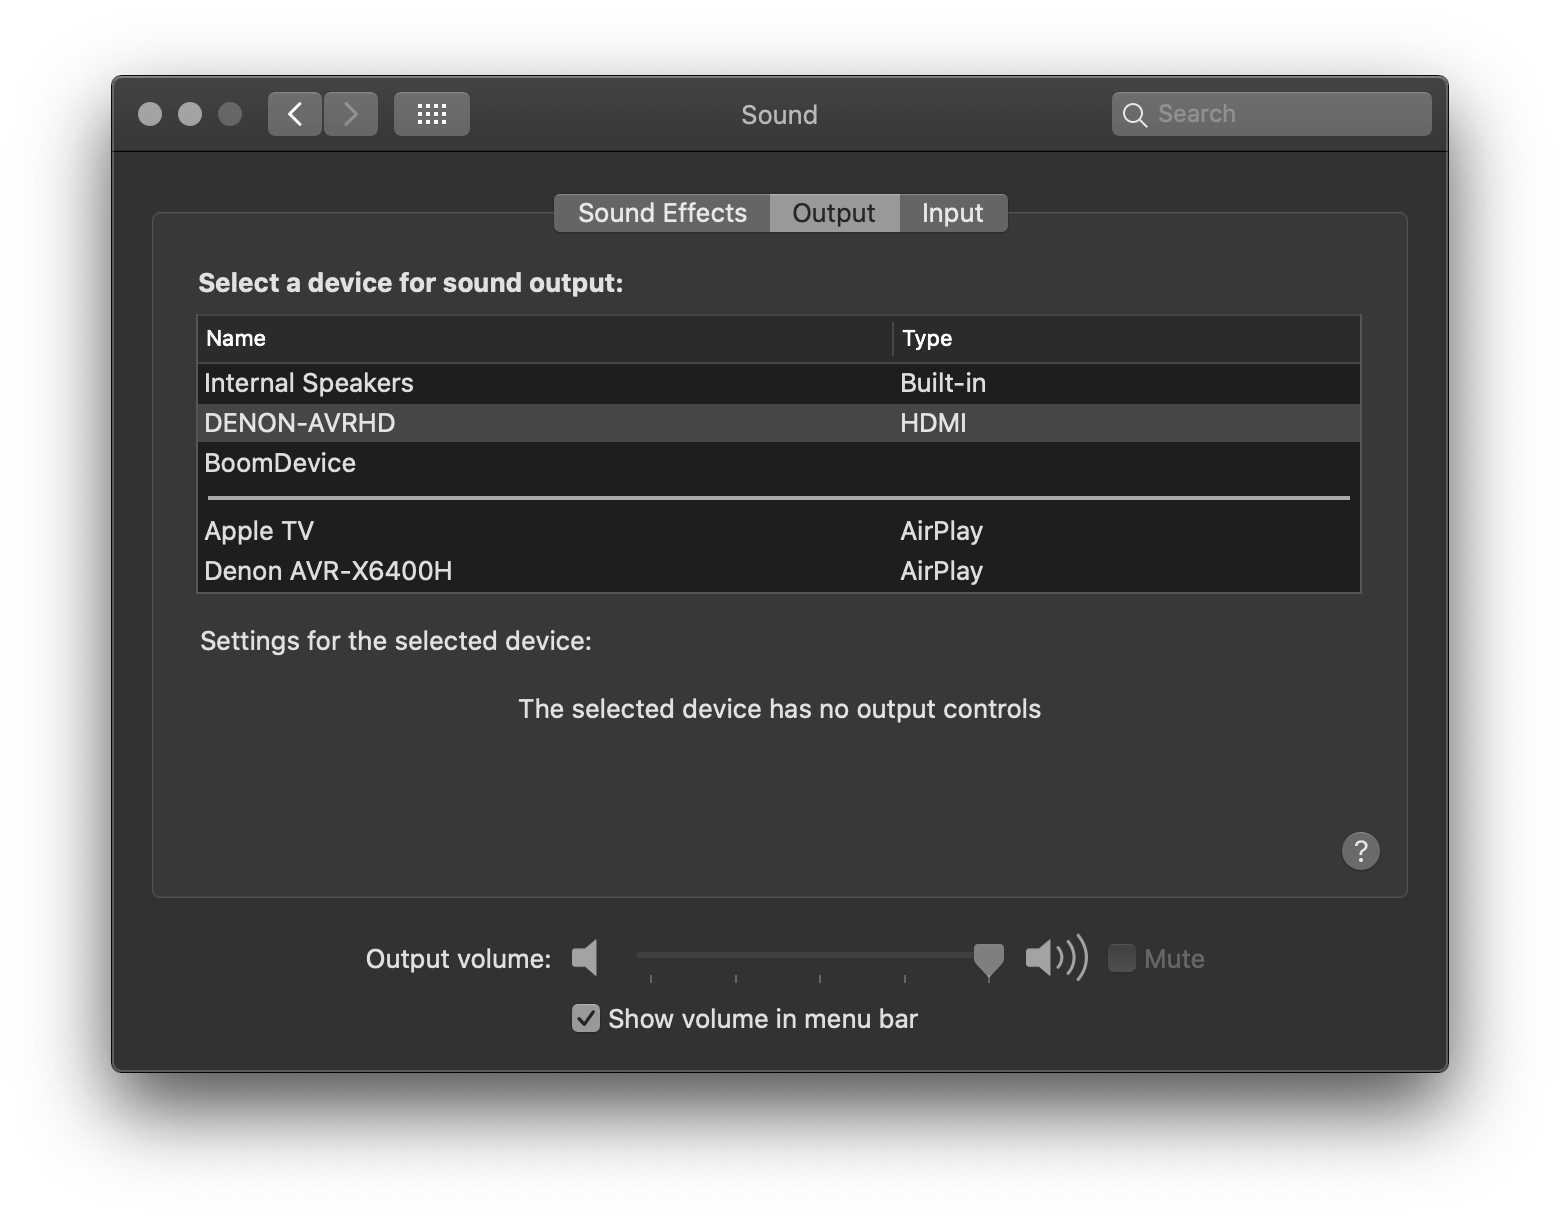
System Preferences > Sound > Output
REW (Room EQ Wizard) is a powerful acoustic analysis software with a variety of tools of measuring and evaluating room and loudspeaker responses. There are a variety of guides for using REW, including official documentation, but this document aims to serve as a layman's guide for getting it quickly setup and allowing you to start exploring its toolsets. This guide will just cover setup and taking room sweeps, but maybe in the future I'll dive in deeper with you.
Setup required will vary depending on your operating system and microphone. This guide will assume OSX. If you are using Windows, refer to the software section of this guide and it should get you setup the same. Many of the steps are very similar, but if you have the ability to choose I'd recommend using OSX because microphone setup is significantly more straight forward.
This tutorial will require the following:
This tutorial will require the following software:
Configuring your microphone and outboard audio is operating system specific. If you are using OSX and comfortable with it, you can keep following my guide. On OSX, it's pretty simple to setup. If you're brand new to OSX, you'll benefit from this detailed guide if you get stuck: How to Setup your Mac for REW [Archive] which is how I learned. This section is basically the same as Enrico's, but is here for the sake of completeness (so I don't have to read multiple sources!). If you are using Windows, use the appropriate section in this tutorial.
I use a 2012 MacBook Pro Retina, which I like for it's HDMI port. Unfortunately, Apple moved away from integrated HDMI ports and so this laptops sole duty is now my EQ laptop. REW works very cleanly on OSX, and requires no additional drivers.
First, lets connect the laptop and microphone:
System Preferences > Sound > Input
System Preferences > Sound > Output
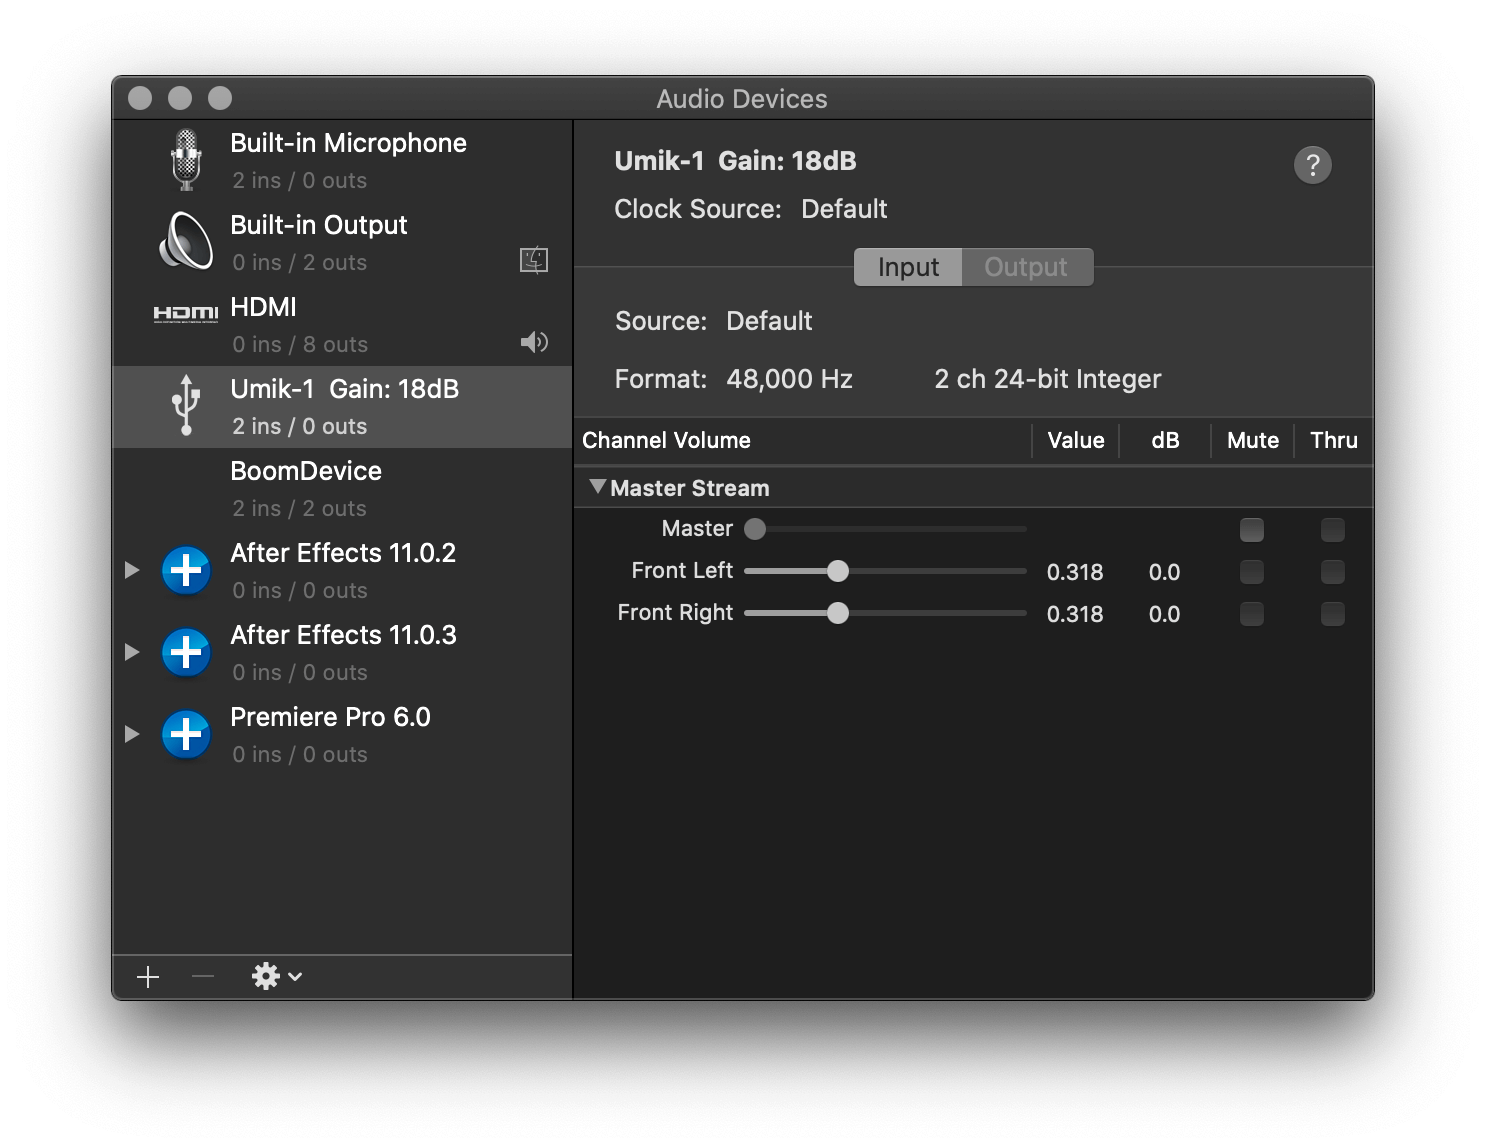
Now lets confirm that the Audio MIDI settings are correct. Go to Applications > Utilities > Audio MIDI Setup.
You should see your receiver and microphone recognized on the left hand side. We need to check that the sample rate matches for both devices. The UMIK-1 has a fixed sample rate of 48kHz.
For HDMI, set the following:
Output = 8 channels - 24bit integer 48.0KHz
*8 channels - 16bit integer 48kHz will work too, the UMIK is 24bit but the sample rate is what matters, not the bit depth.
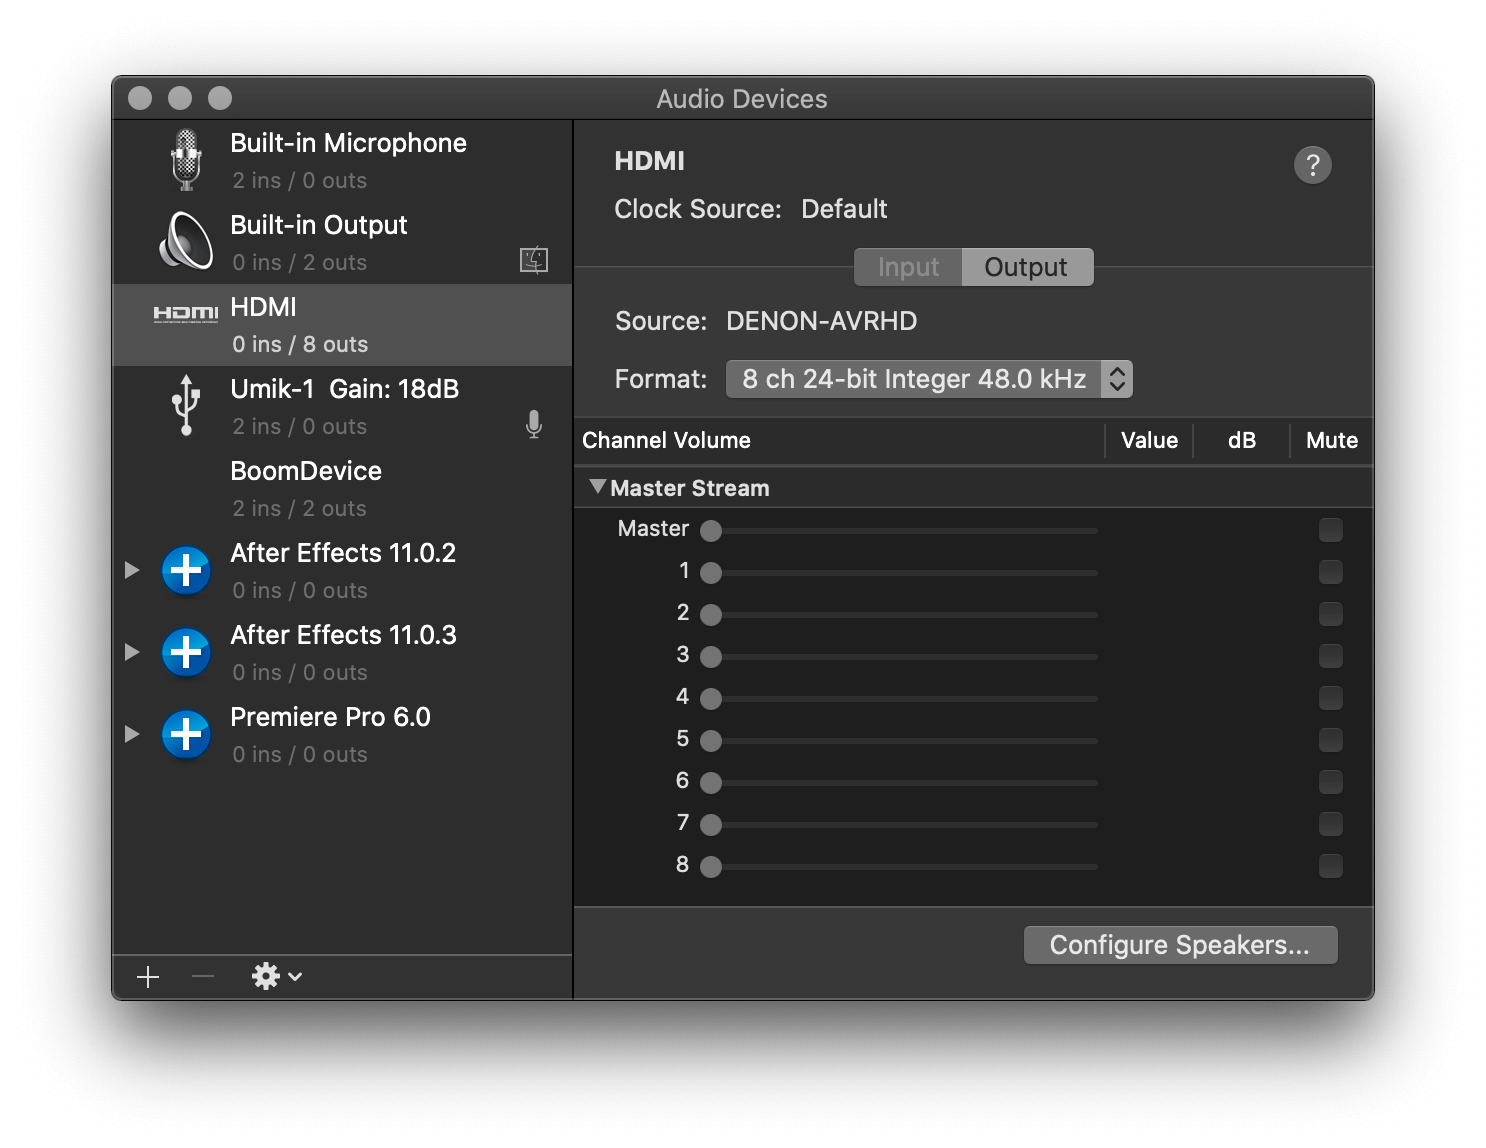
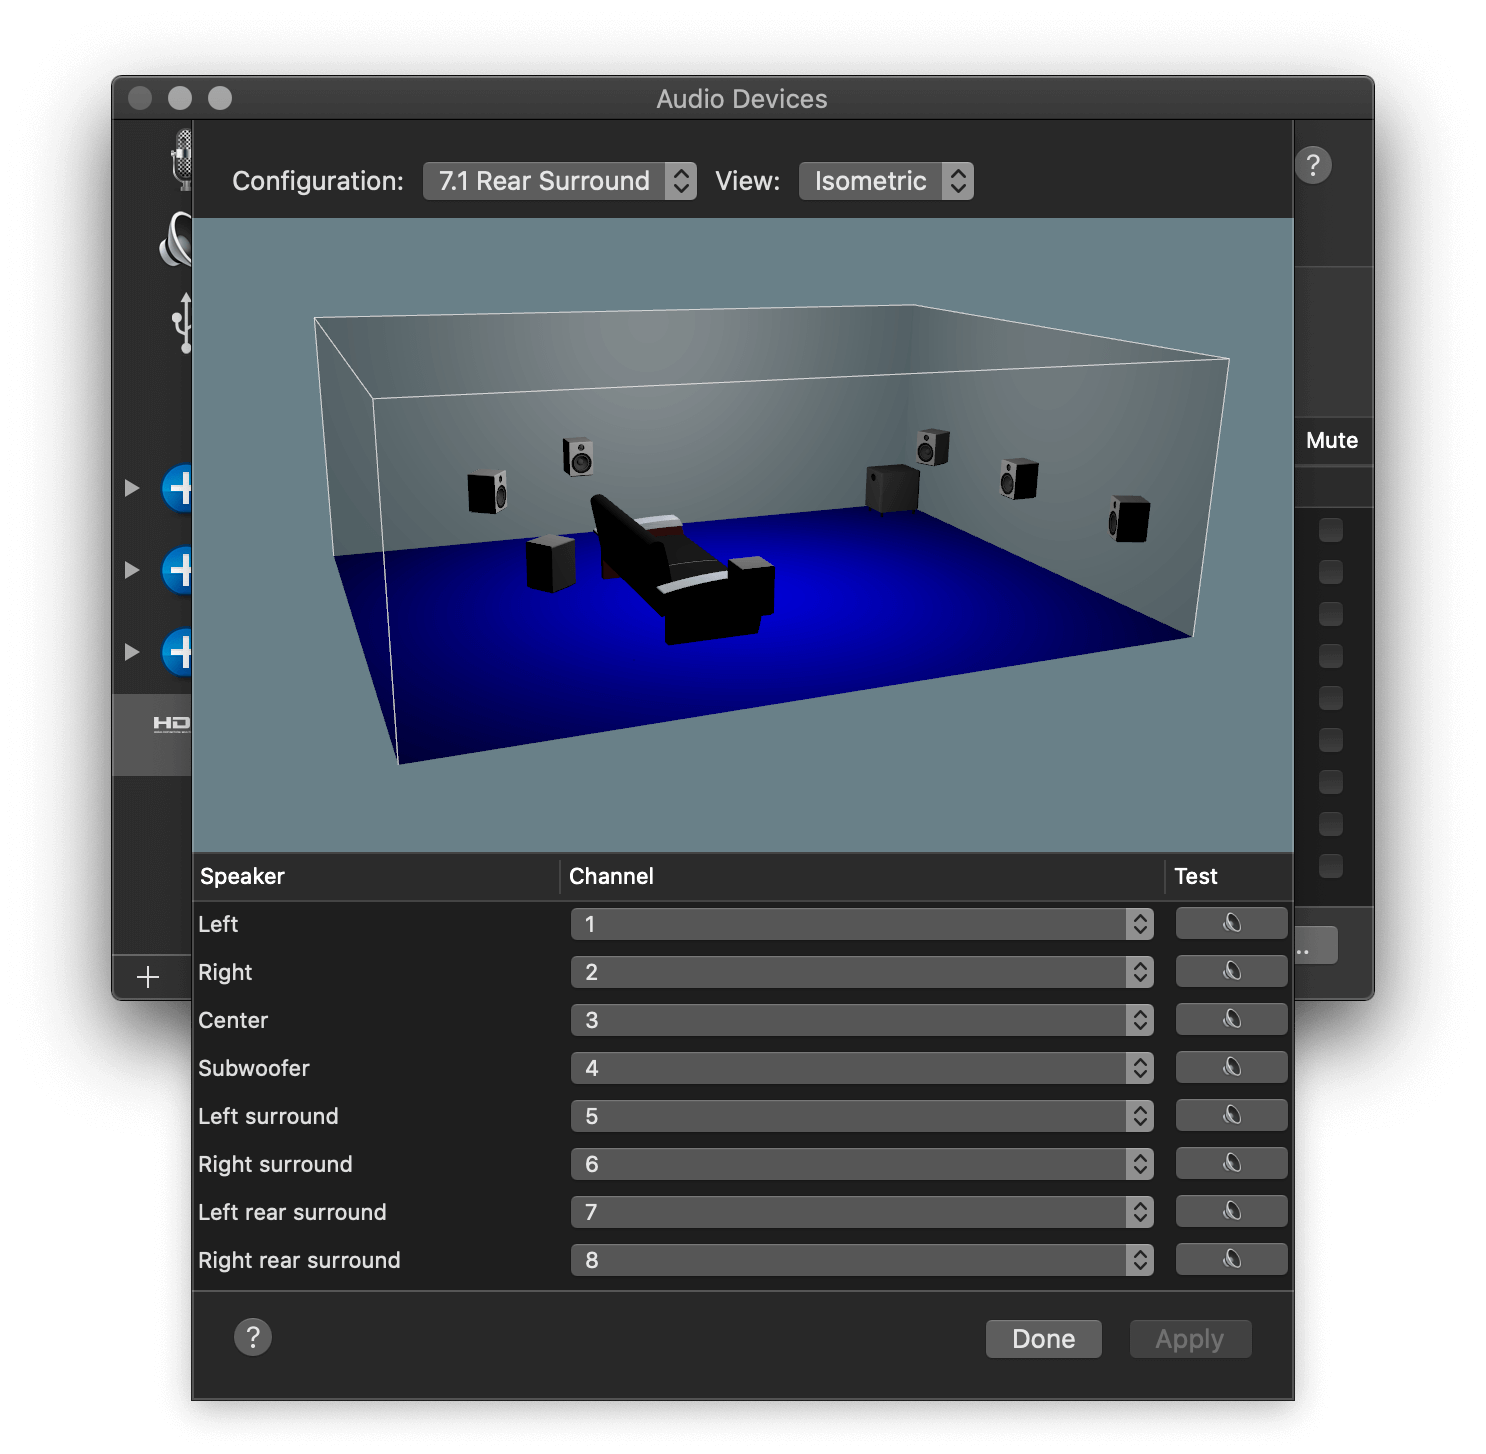
Next, in the Output window, click Configure Speakers and set it to 7.1 channel. Press Apply.
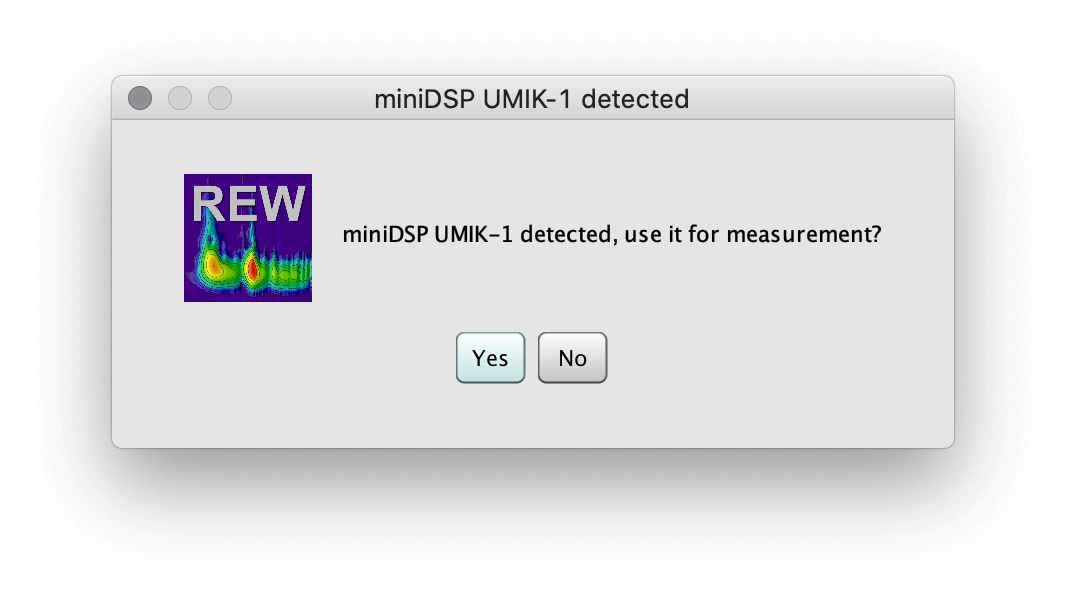
Now open REW. When REW loads, you should see a prompt telling you you're UMIK-1 was detected. Press Yes to accept.
If this was the first time loading the microphone, it will also prompt you to load the calibration file. Store the calibration file someplace safe on your hard drive (and keep a backup). Use the 90-deg file, since we'll be pointing our microphone straight up.
Now go to Preferences and we'll configure the Input and Output devices. We want to confirm that the sample rate is 48KHz to match our microphone. This should be automatically set from when we configured Audio MIDI.
First select Output Device and choose HDMI. Next, select Input Device and choose UMIK-1. Remember that if you're using a hub for HDMI, it will show as Display Port or whatever the interface of the adapter is. Output should be set to HDMI and Input to Microphone. I'm using the L(eft) channel, with the (R)ight for Loopback.
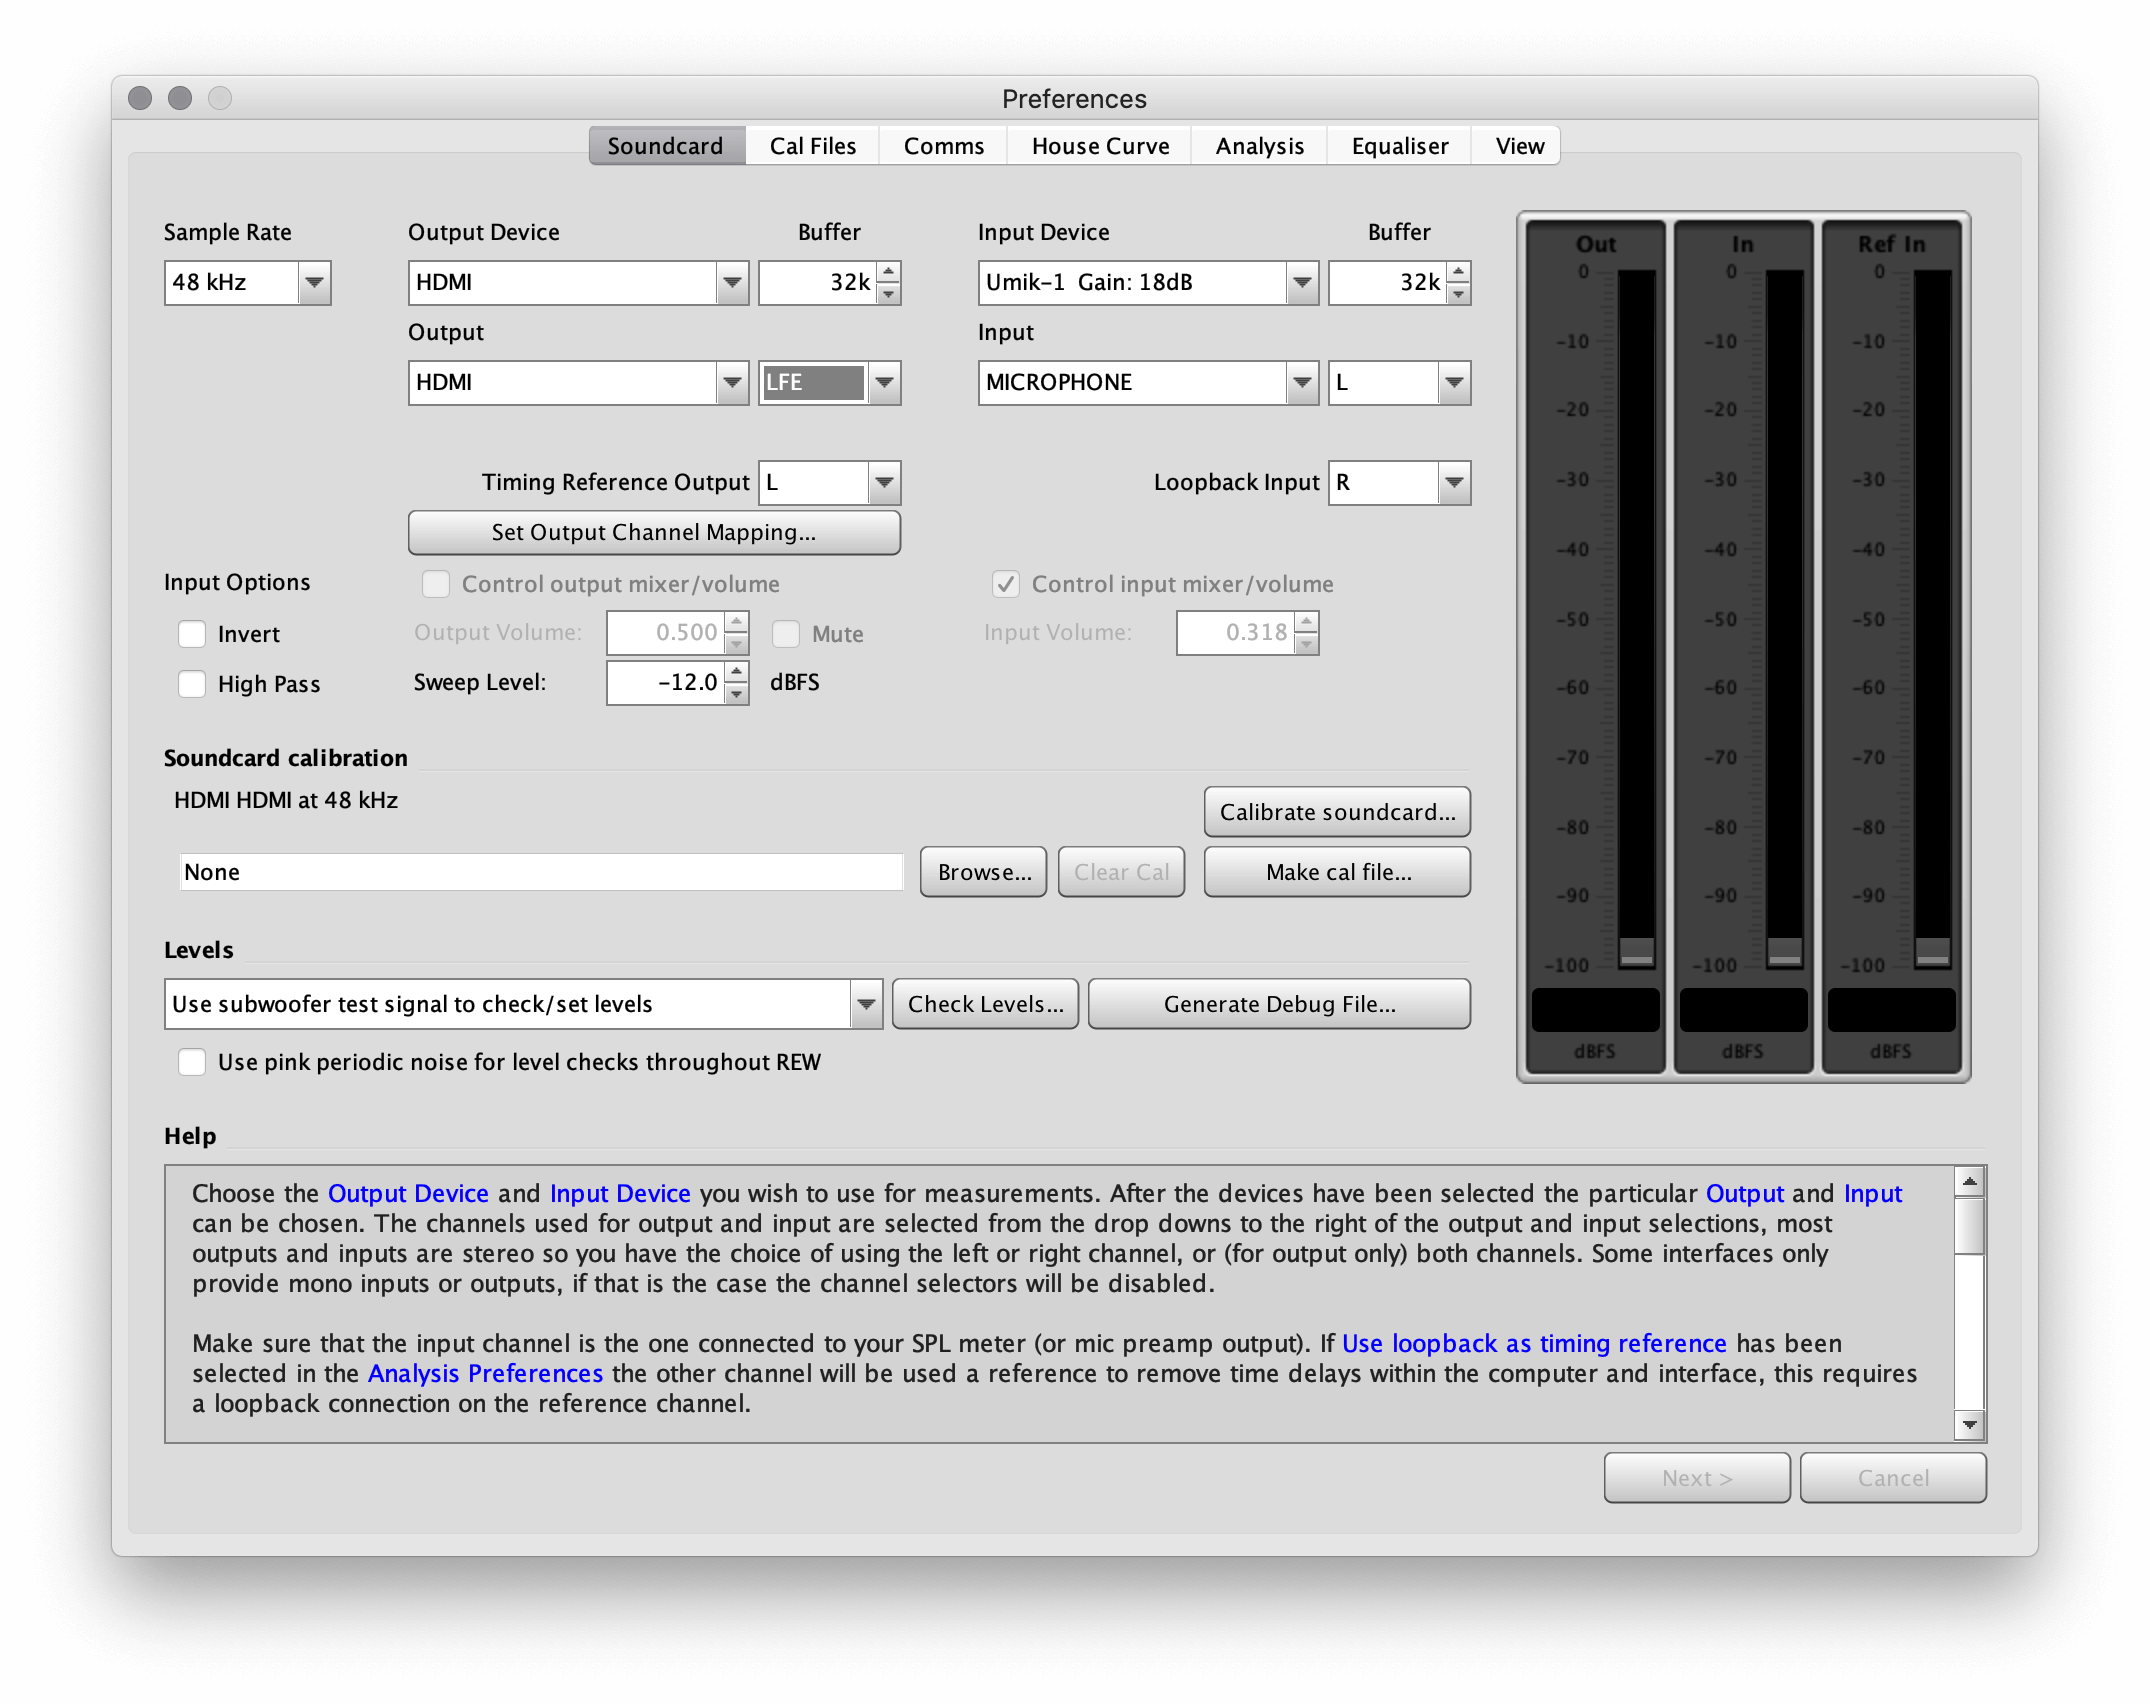
The HDMI drop down will show each channel labelled. For timing reference, I use the left. It can really be anything except for the LFE channel. This should always stay the same once you decide.
Finally, go to Cal Files and confirm that your configuration file is showing (the 90-deg one).

Now that everything is configured, we're ready to start using the measurement tool.
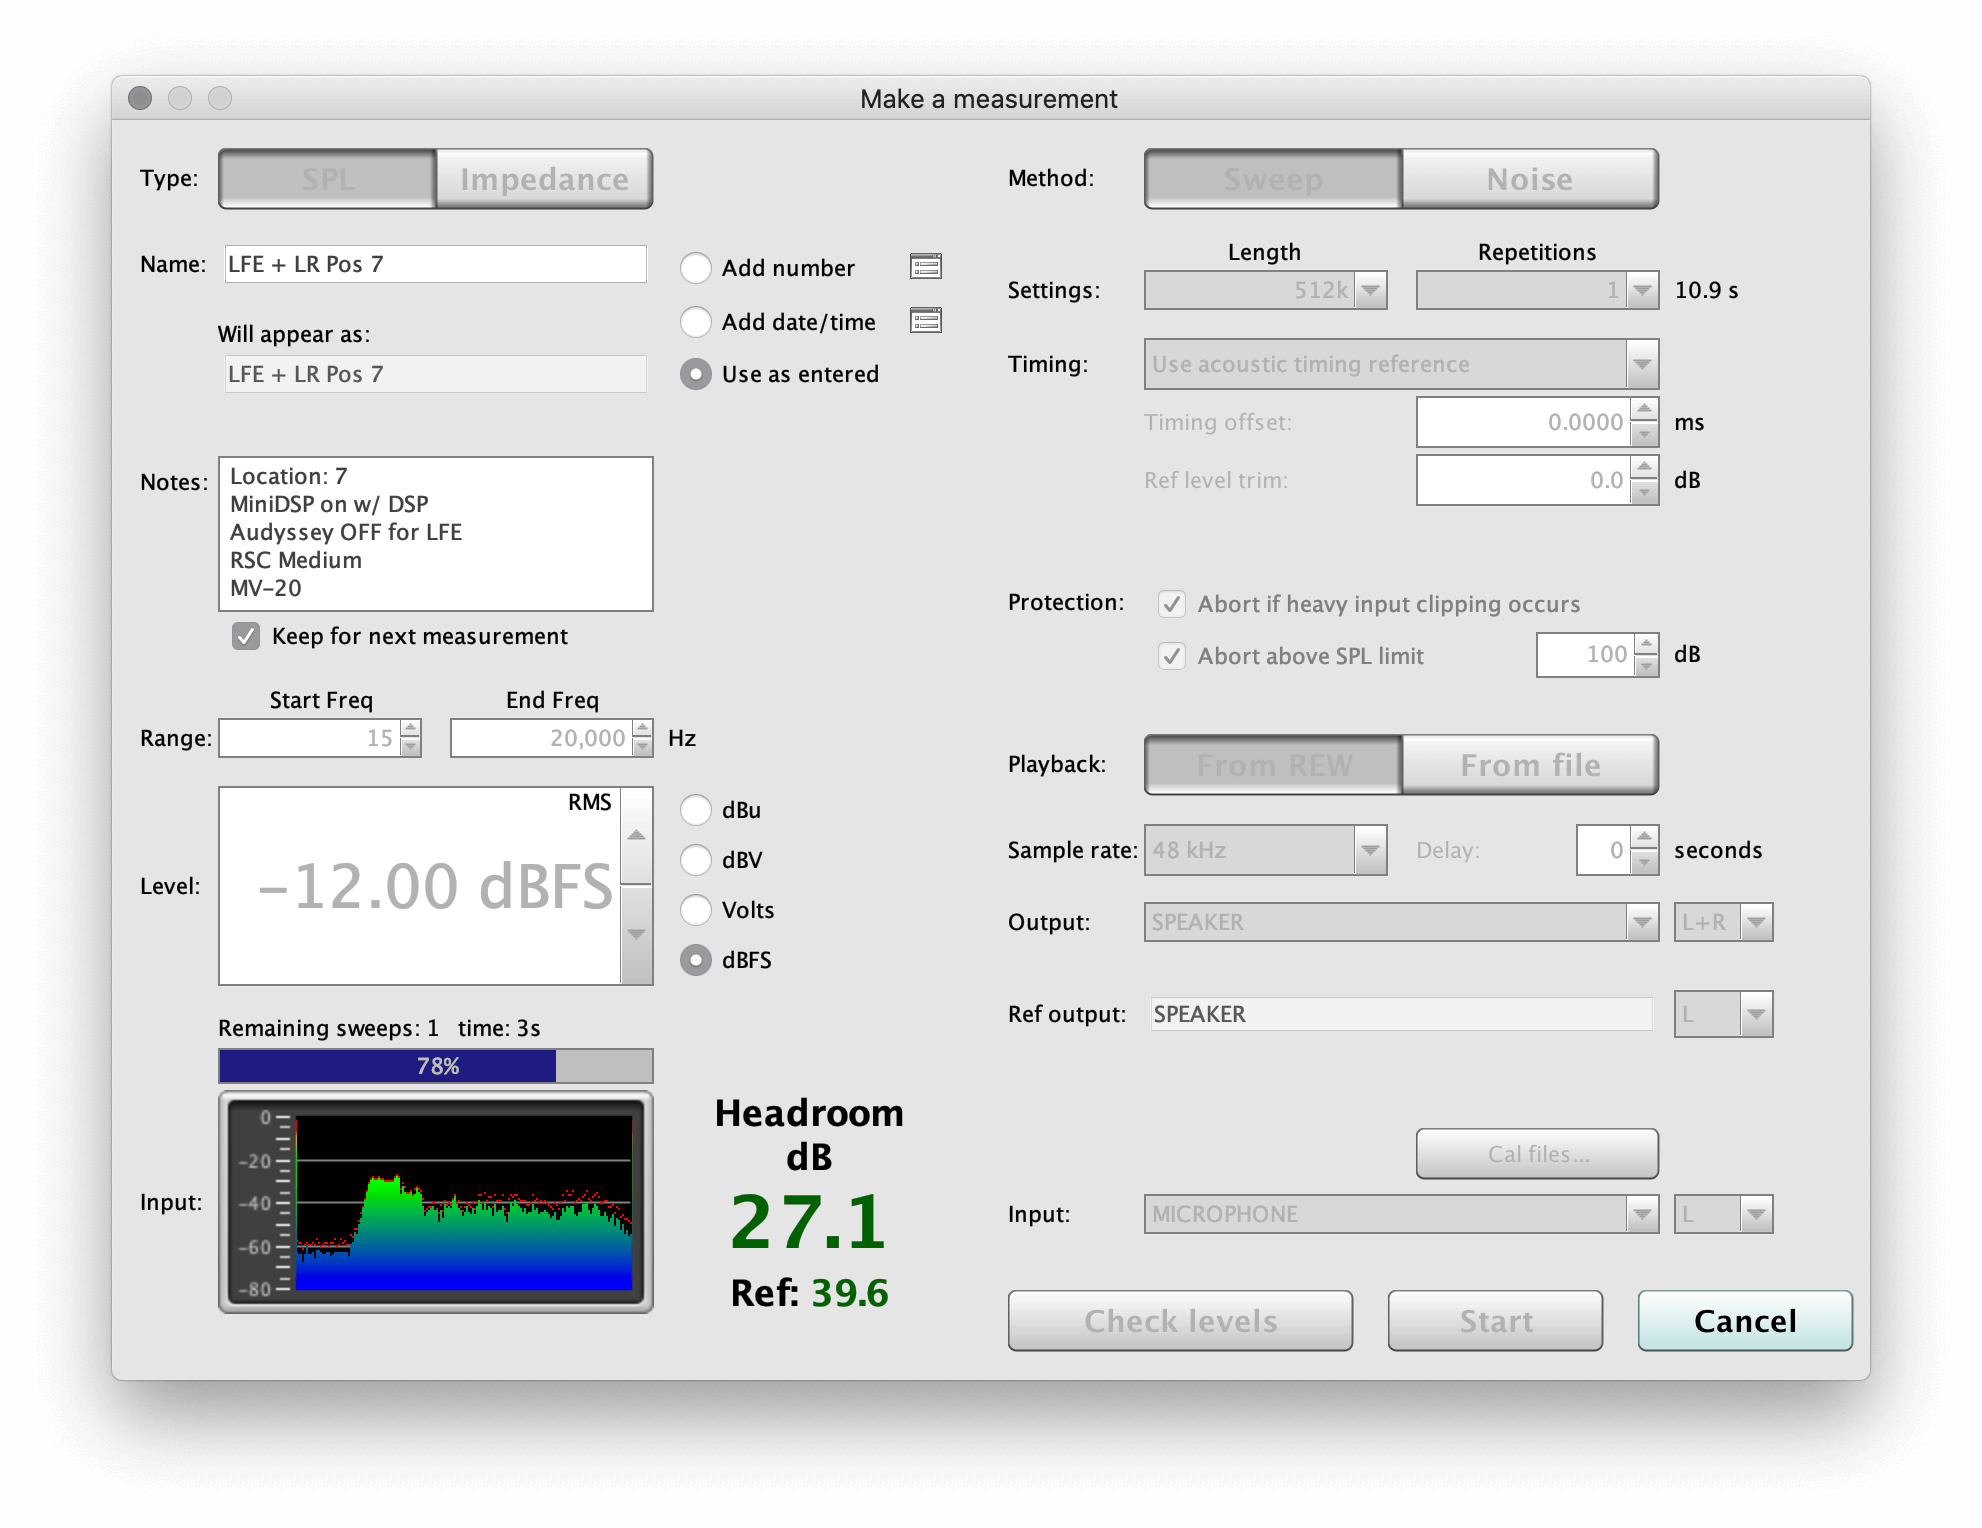
At this point, it's a good idea to take a test measurement and make sure everything is working. We'll get into more detail later, but for now just set the microphone at the main listening position. Select Measure from the menu bar and the "Make a Measurement" window will appear.
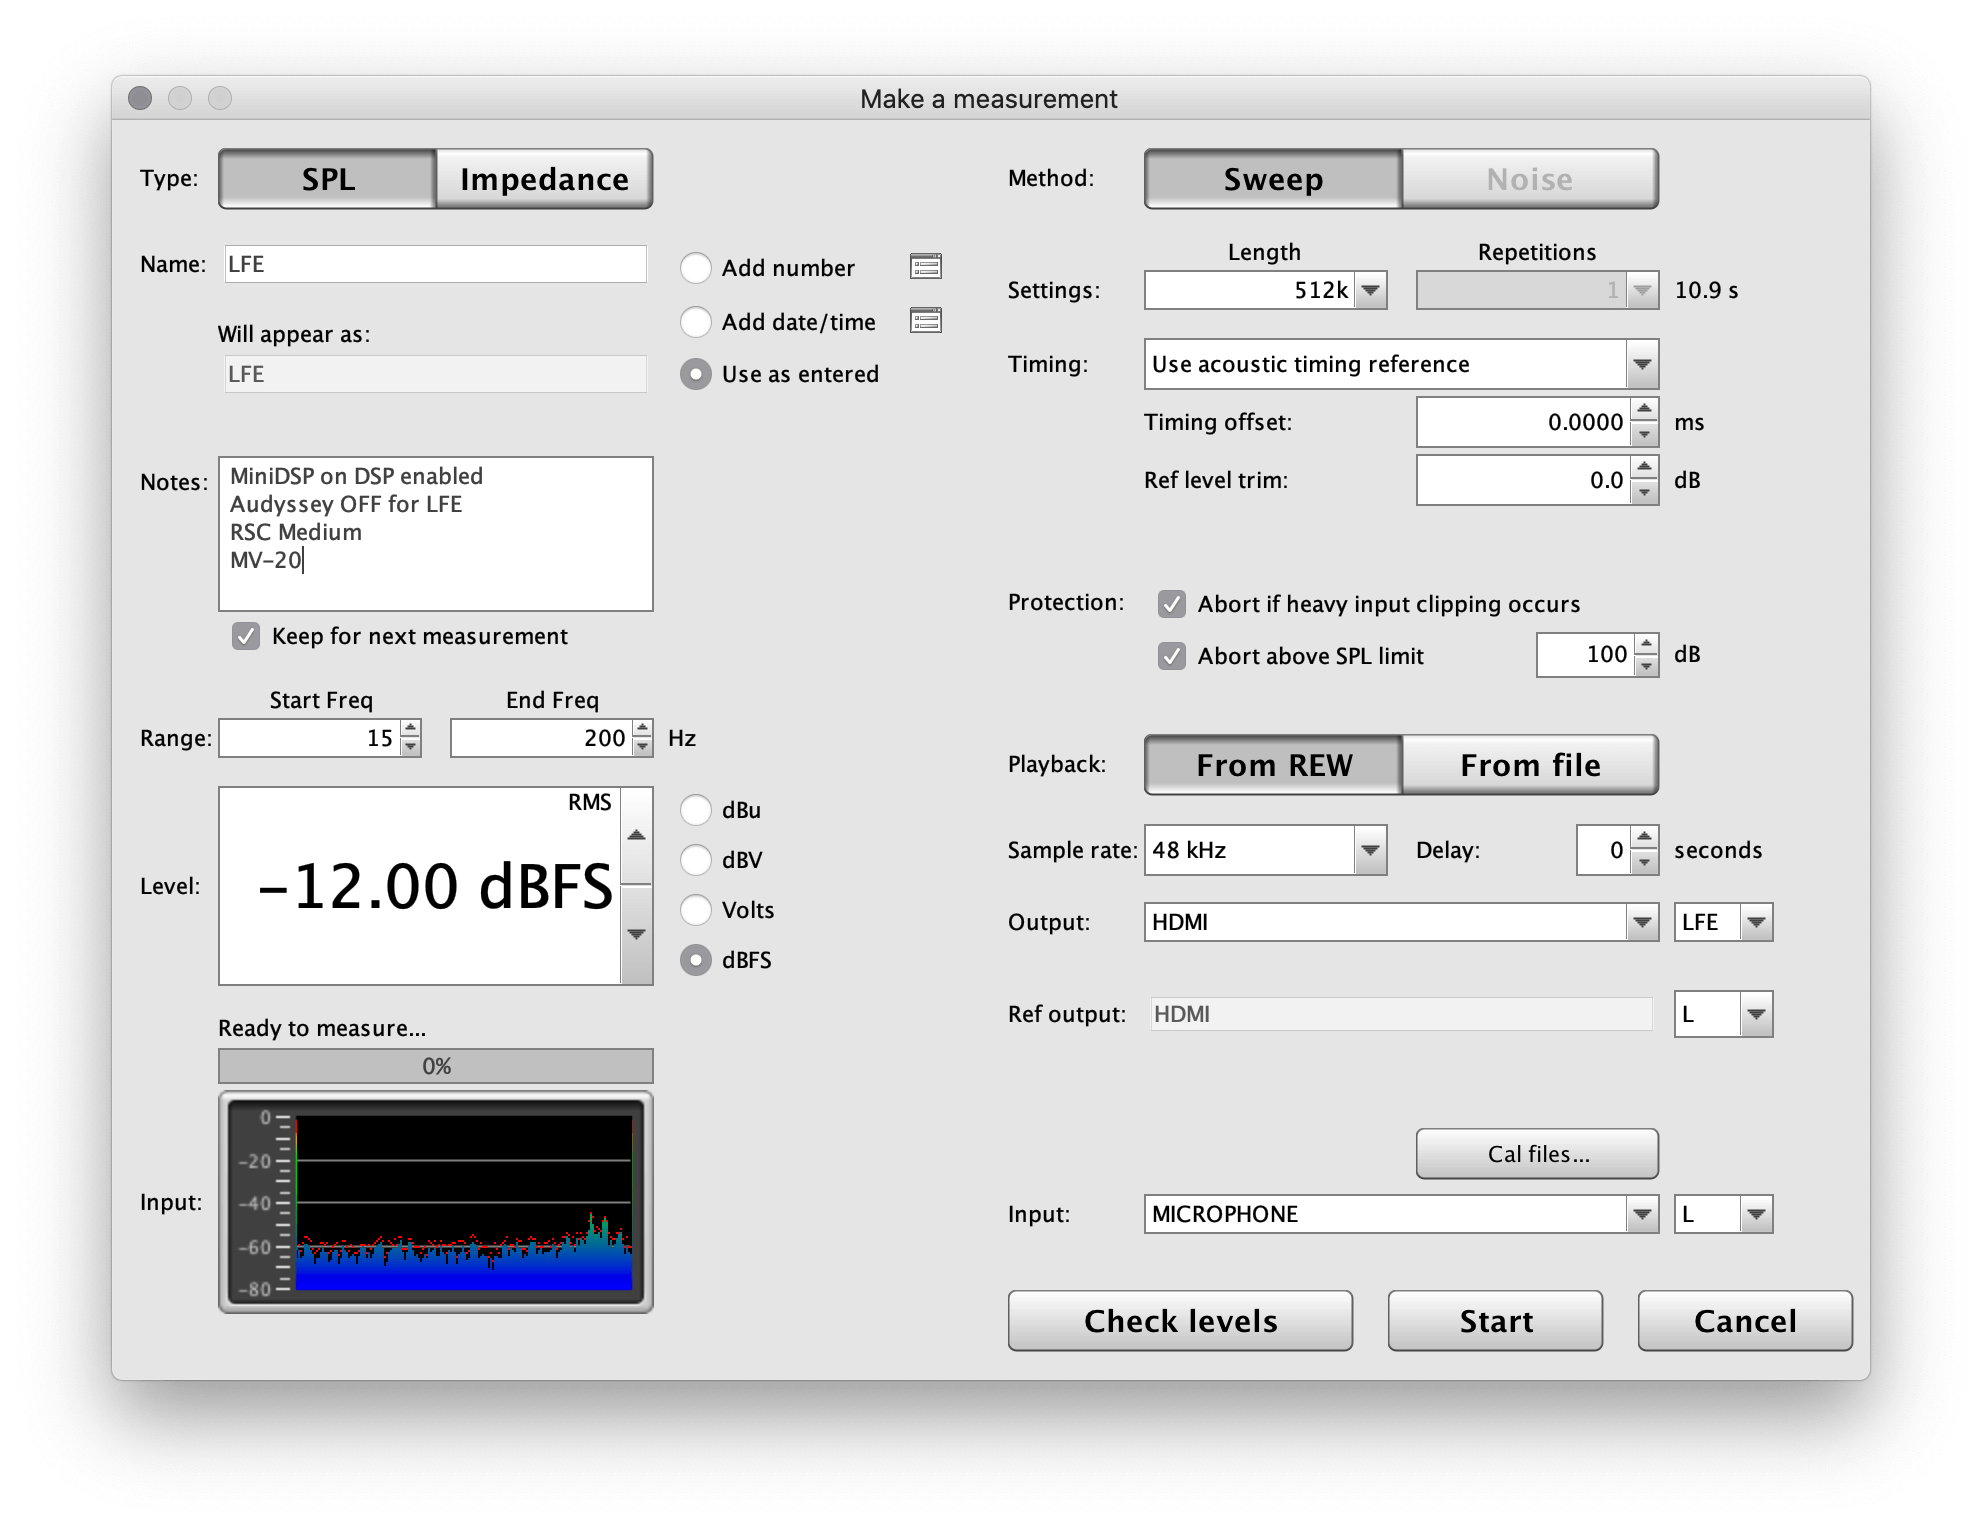
A few things to unpack here:
SPL because we're going to measure the dB SPL of a frequency sweep to get our response in the room.I tend to set my master volume to -20 to run measurements. The measurements need to be run loud enough above ambient level, but they don't need to be excruciatingly loud. It does not need to be very loud because the ambient SPL in the room combines the total weight of the entire frequency range, yet when REW takes its measurement sweep it has all its energy at a single frequency. Since the ambient SPL of that particular frequency is much lower than the combined, the signal to noise is better than it initially seems. You can further help the signal-to-noise ratio by using longer sweep lengths (we gain 3dB for every doubling of the sweep length).
Now press Check Levels. This checks that everything is okay. If you're subs are wake on signal, it will also wake them up, after throwing an error. If that happens just re-check.
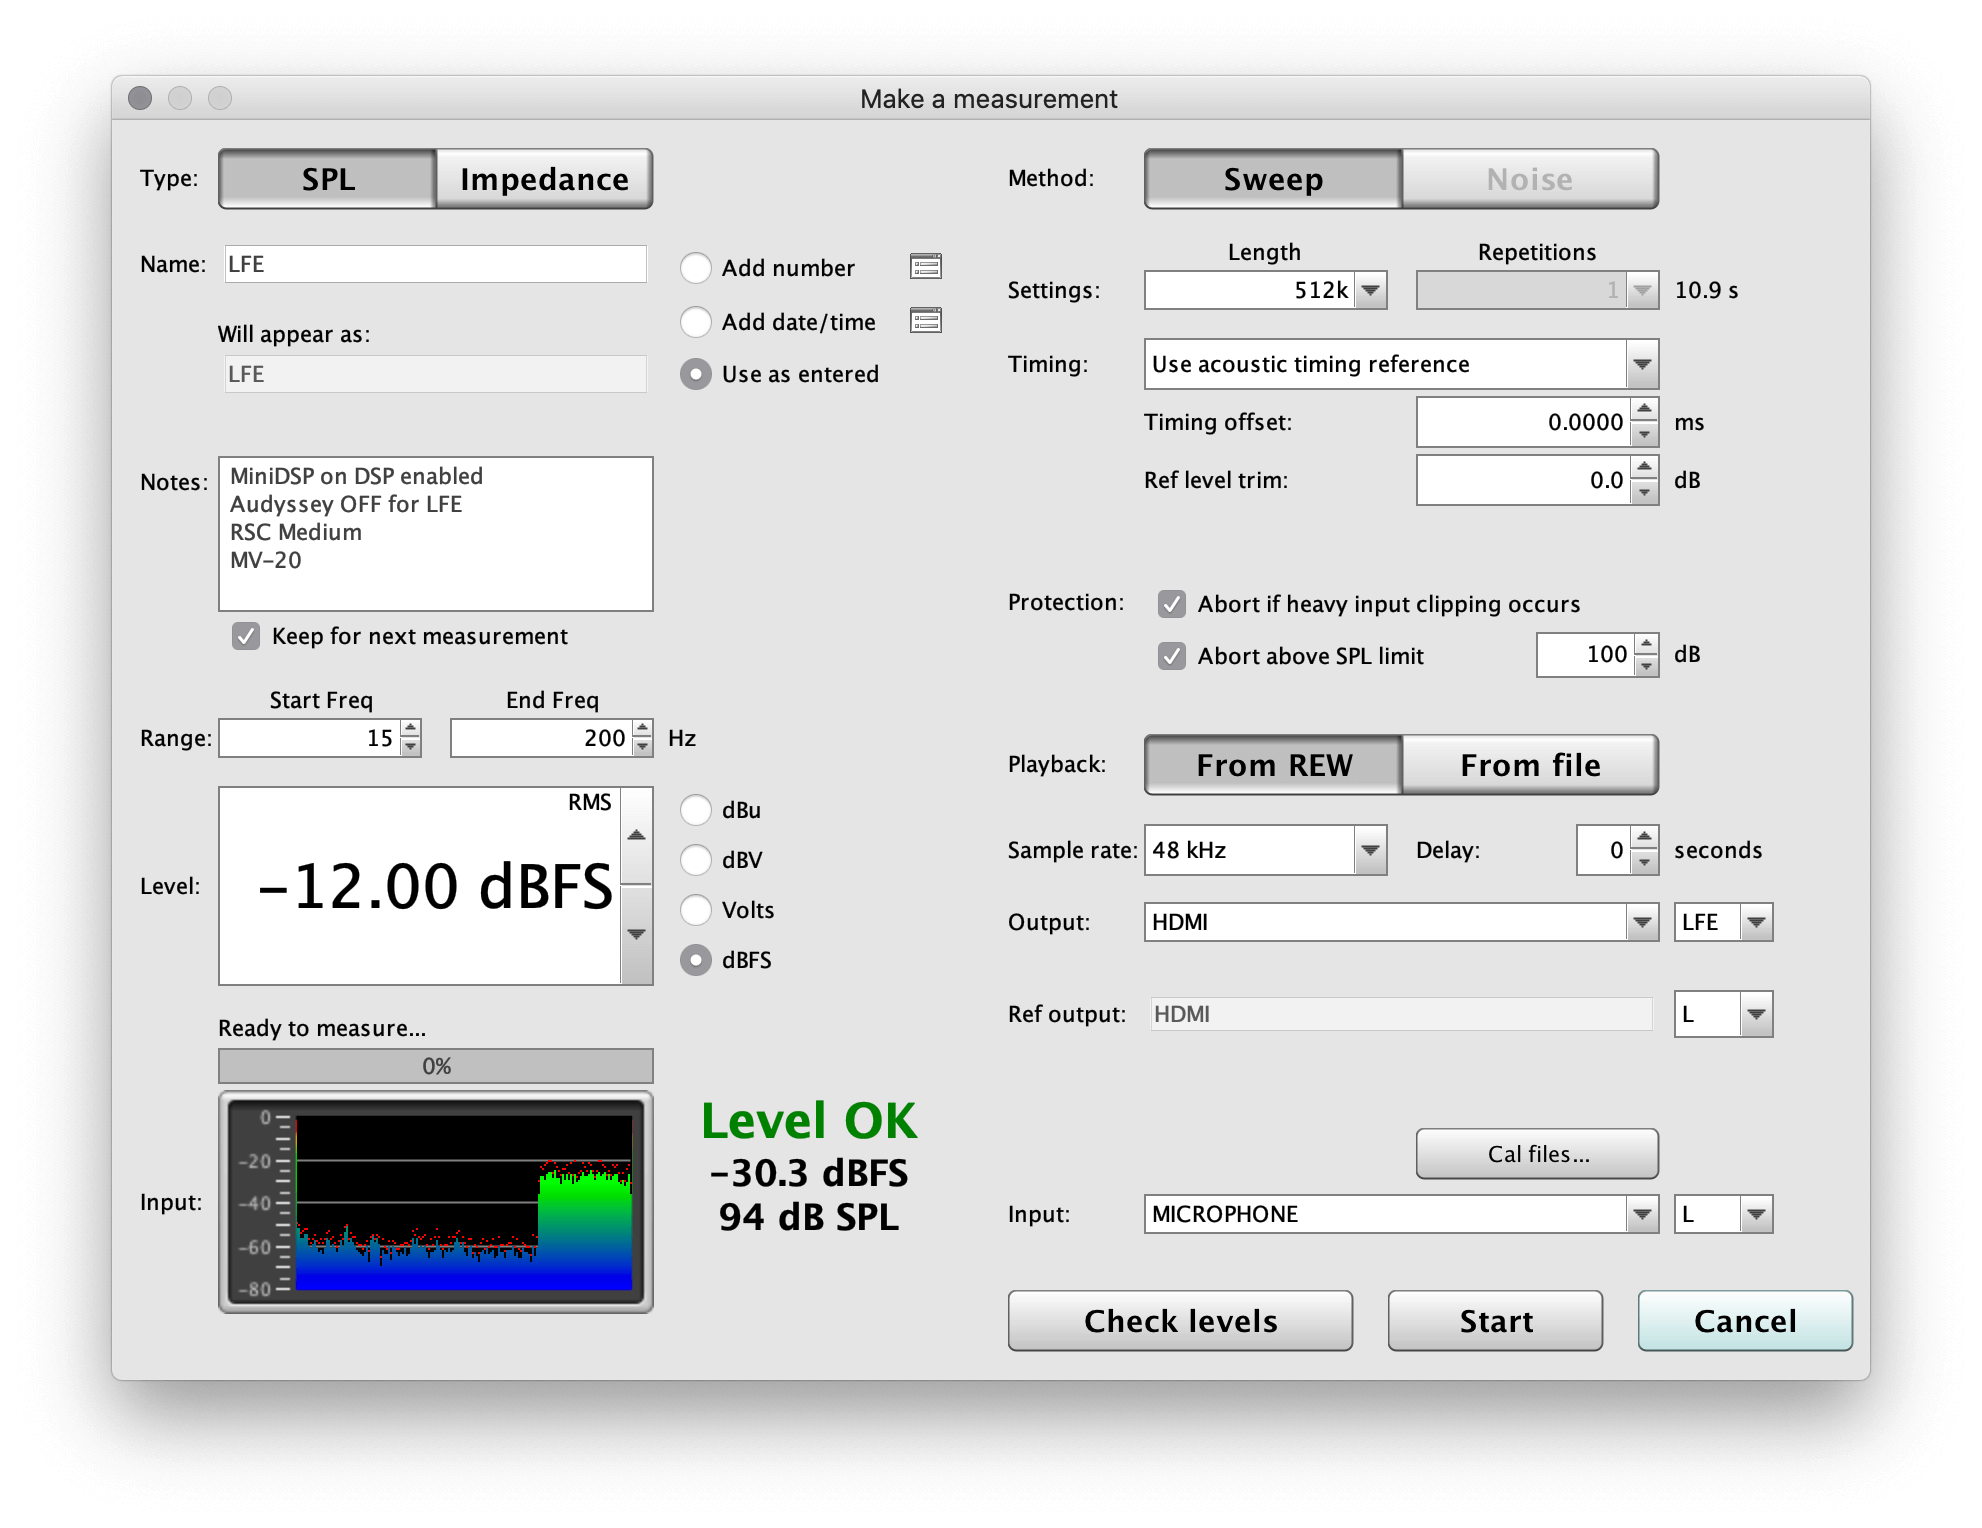
If everything is good, take a measurement.
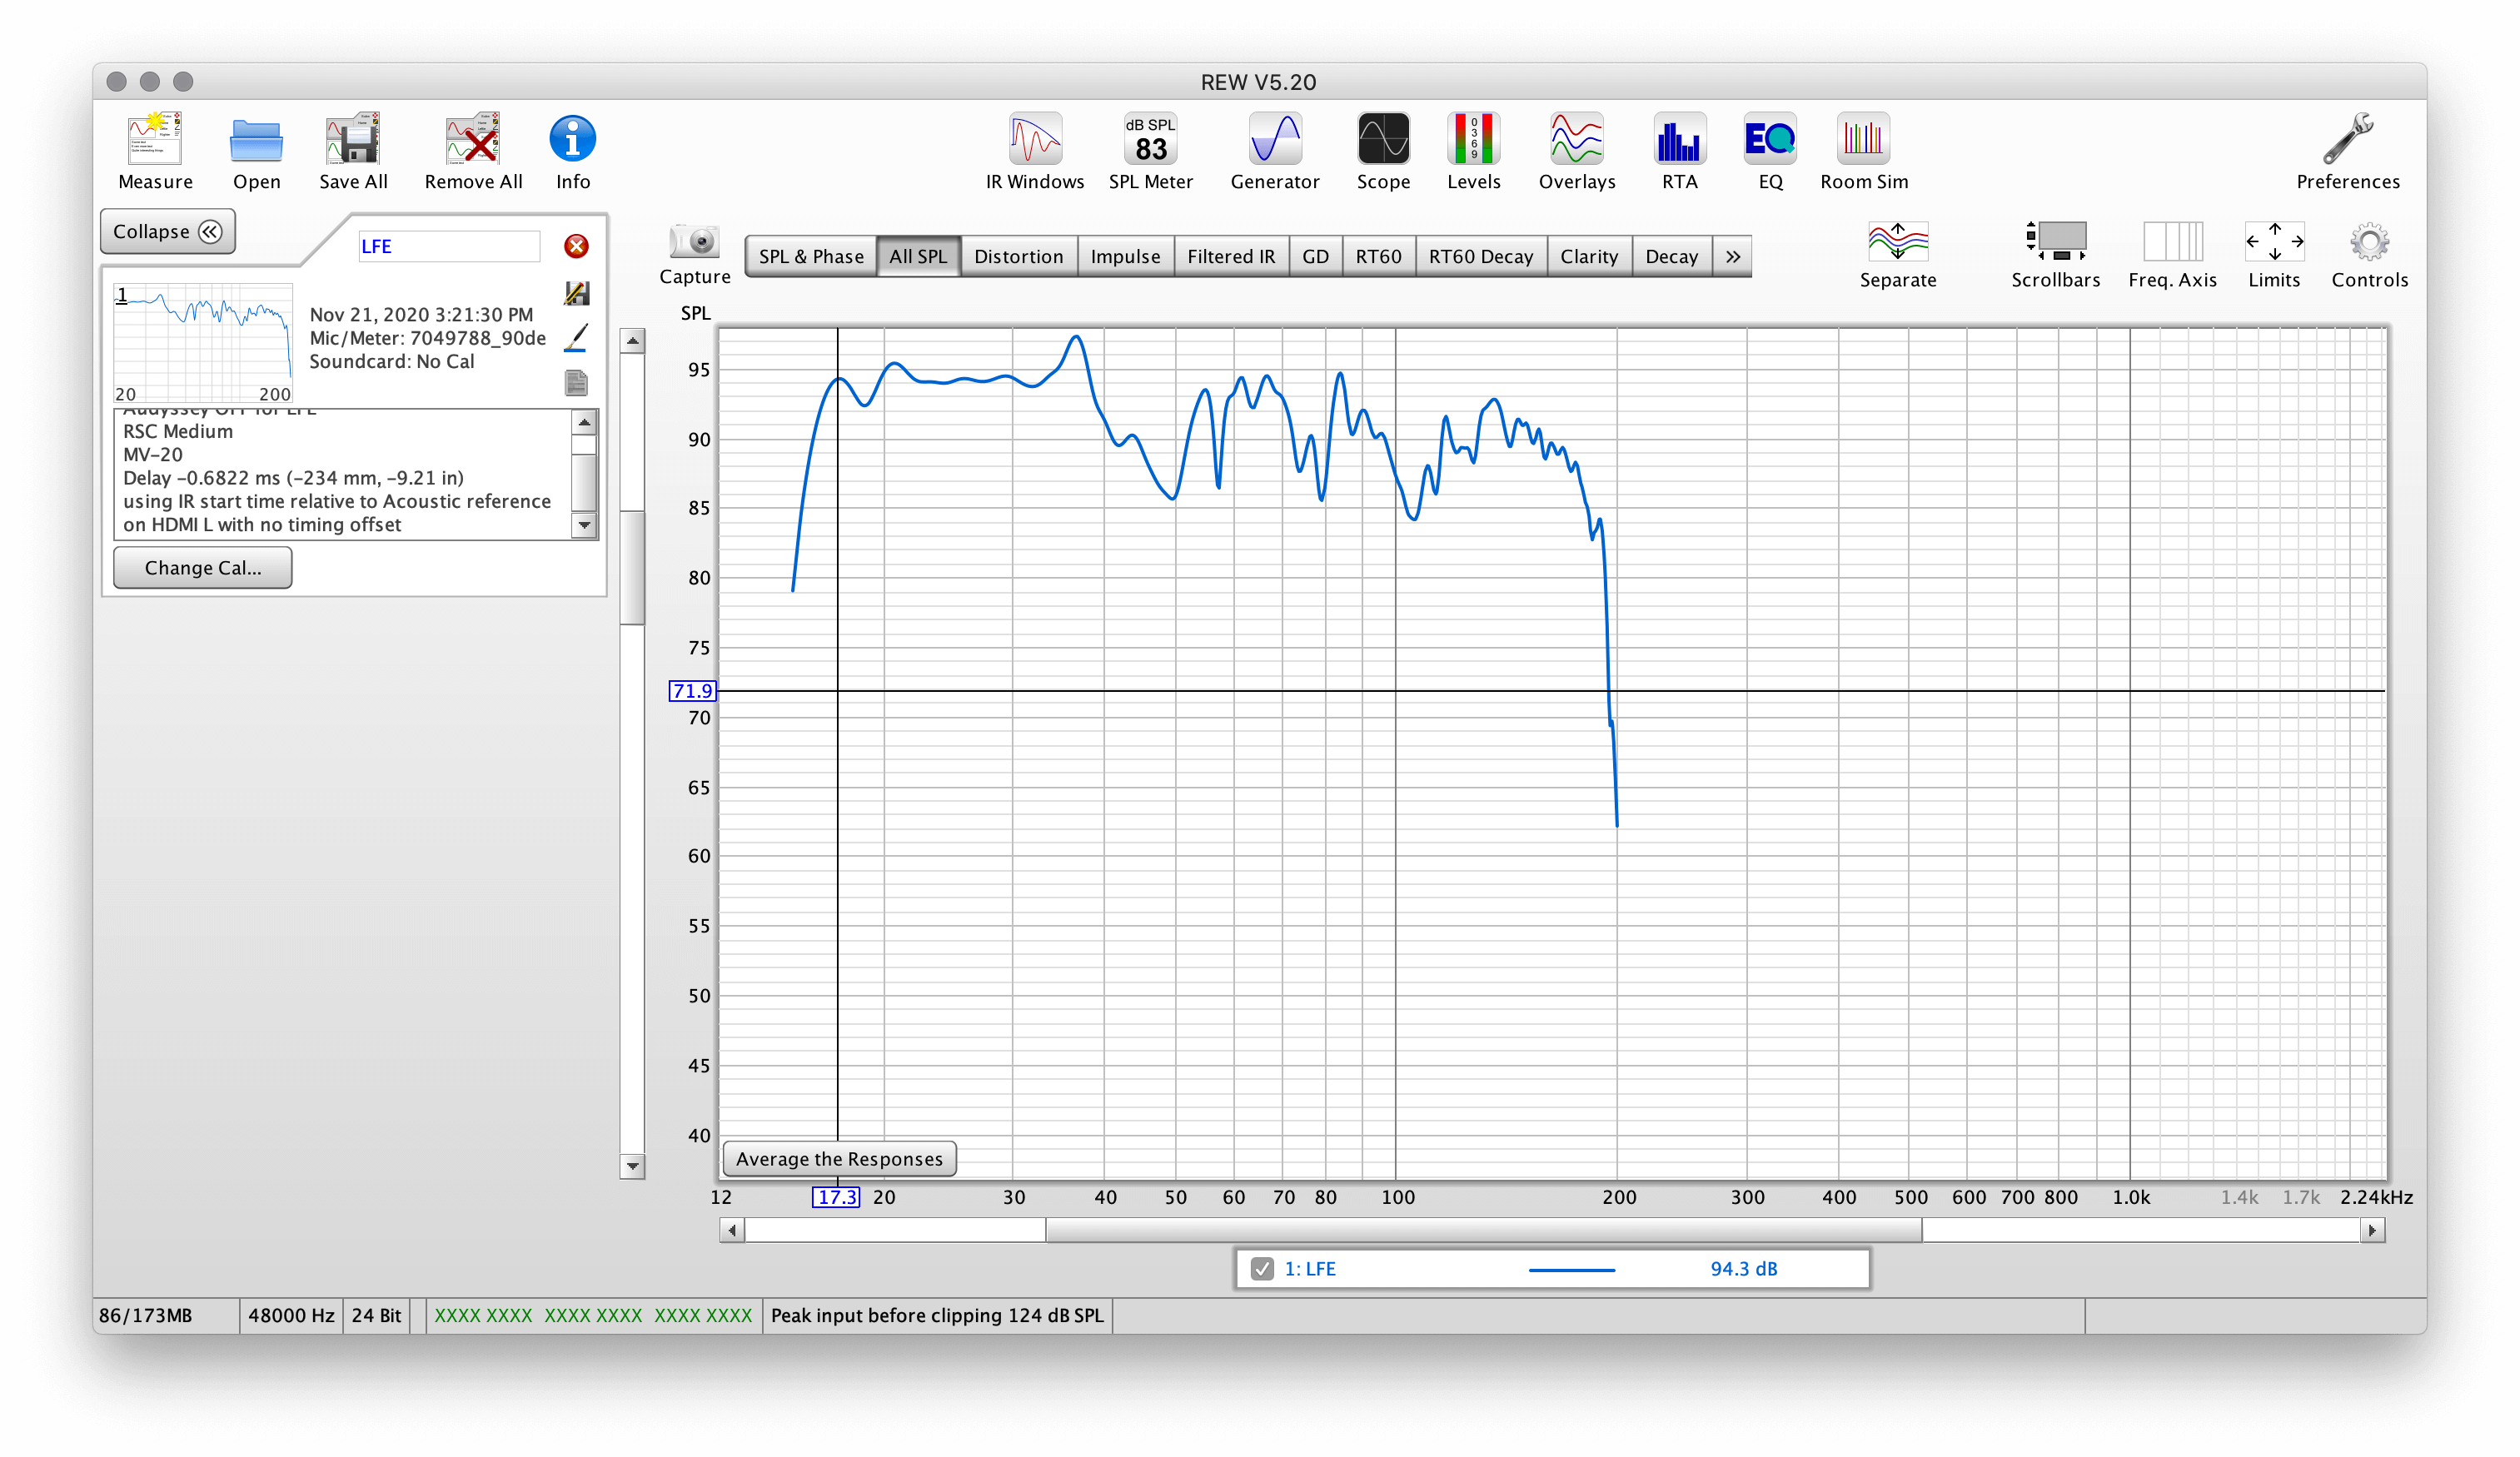
Looks like everything is working.
Now is a good time to mention graph settings. Typically for a subwoofer graph the standard is setting the vertical range 45dB to 105dB, and the horizontal 15Hz to 200Hz. In large rooms or with subwoofers that play very deep, consider extending that deeper. For full range sweeps, the vertical Y axis stays the same but the sweep is 15Hz to 20kHz. The key is to be consistent when taking your measurements and exporting screenshots.
To set the ranges, select Limits in the upper right menu.
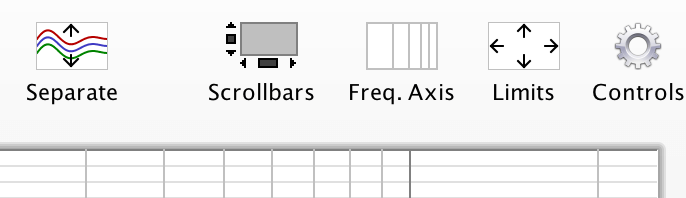
You'll then be able to set your graph limits within the dialog box.

Next some smoothing can be applied. Do not apply smoothing to subwoofer sweeps (until applying EQ, where you'll use VAR smoothing), but for full range 1/6-octave smoothing is ideal. To apply smoothing, select the sweeps below the graph that you wish to change the smoothing on. Once you have selected the desires sweeps, press the Controls icon to adjust the smoothing.

The graphs should be set as logarithmic, which is toggled by pressing the Freq. Axis icon.
You should now have consistent looking graphs that will allow for easy visual comparisons.
Before beginning calibration, it's important to get a snapshot or two of where your system is at currently. If the system has never been calibrated before, this might be after a quick level match with an SPL meter only. If the system has been calibrated before, it makes sense to gather graphs in various states such as: current state (say with Audyssey and any MiniDSP EQ enabled), Audyssey disabled, MiniDSP EQ disabled. The purpose of these snapshots should be to help you calibrate after any changes you make. For example, if you are changing or moving subwoofers, how was your performance before? These measurements will serve as a baseline to see if your changes were productive or not.
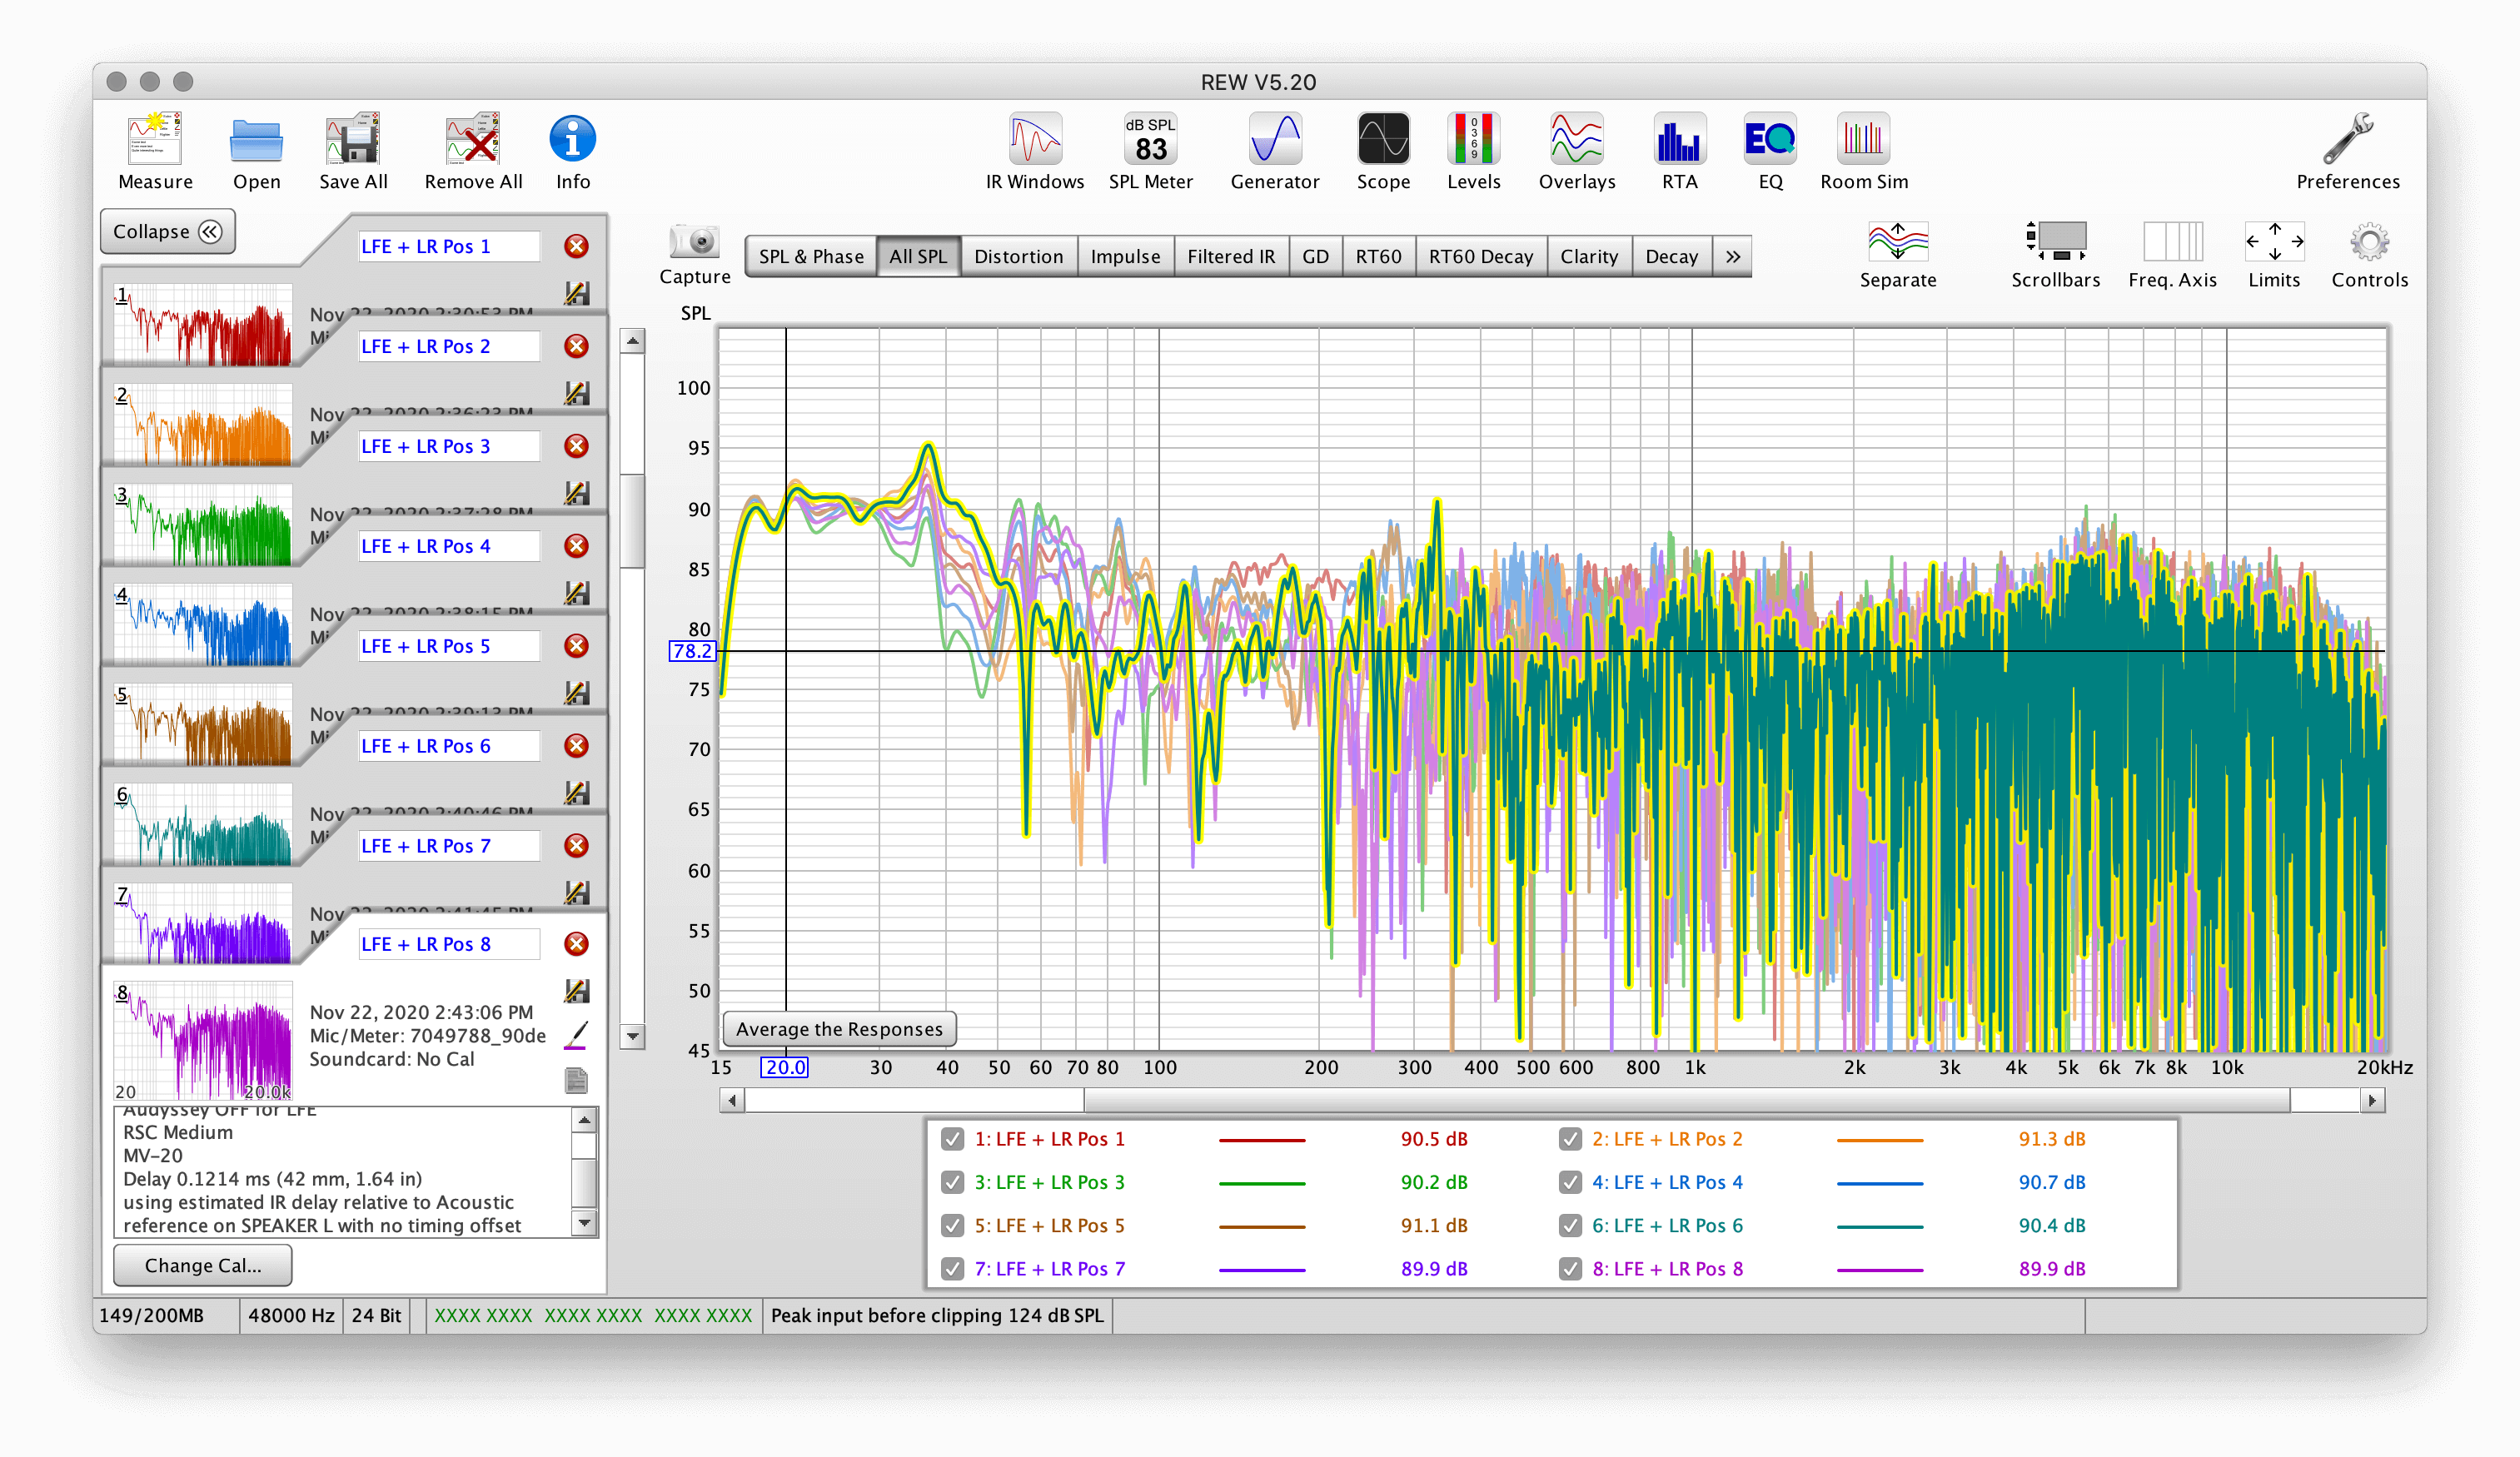
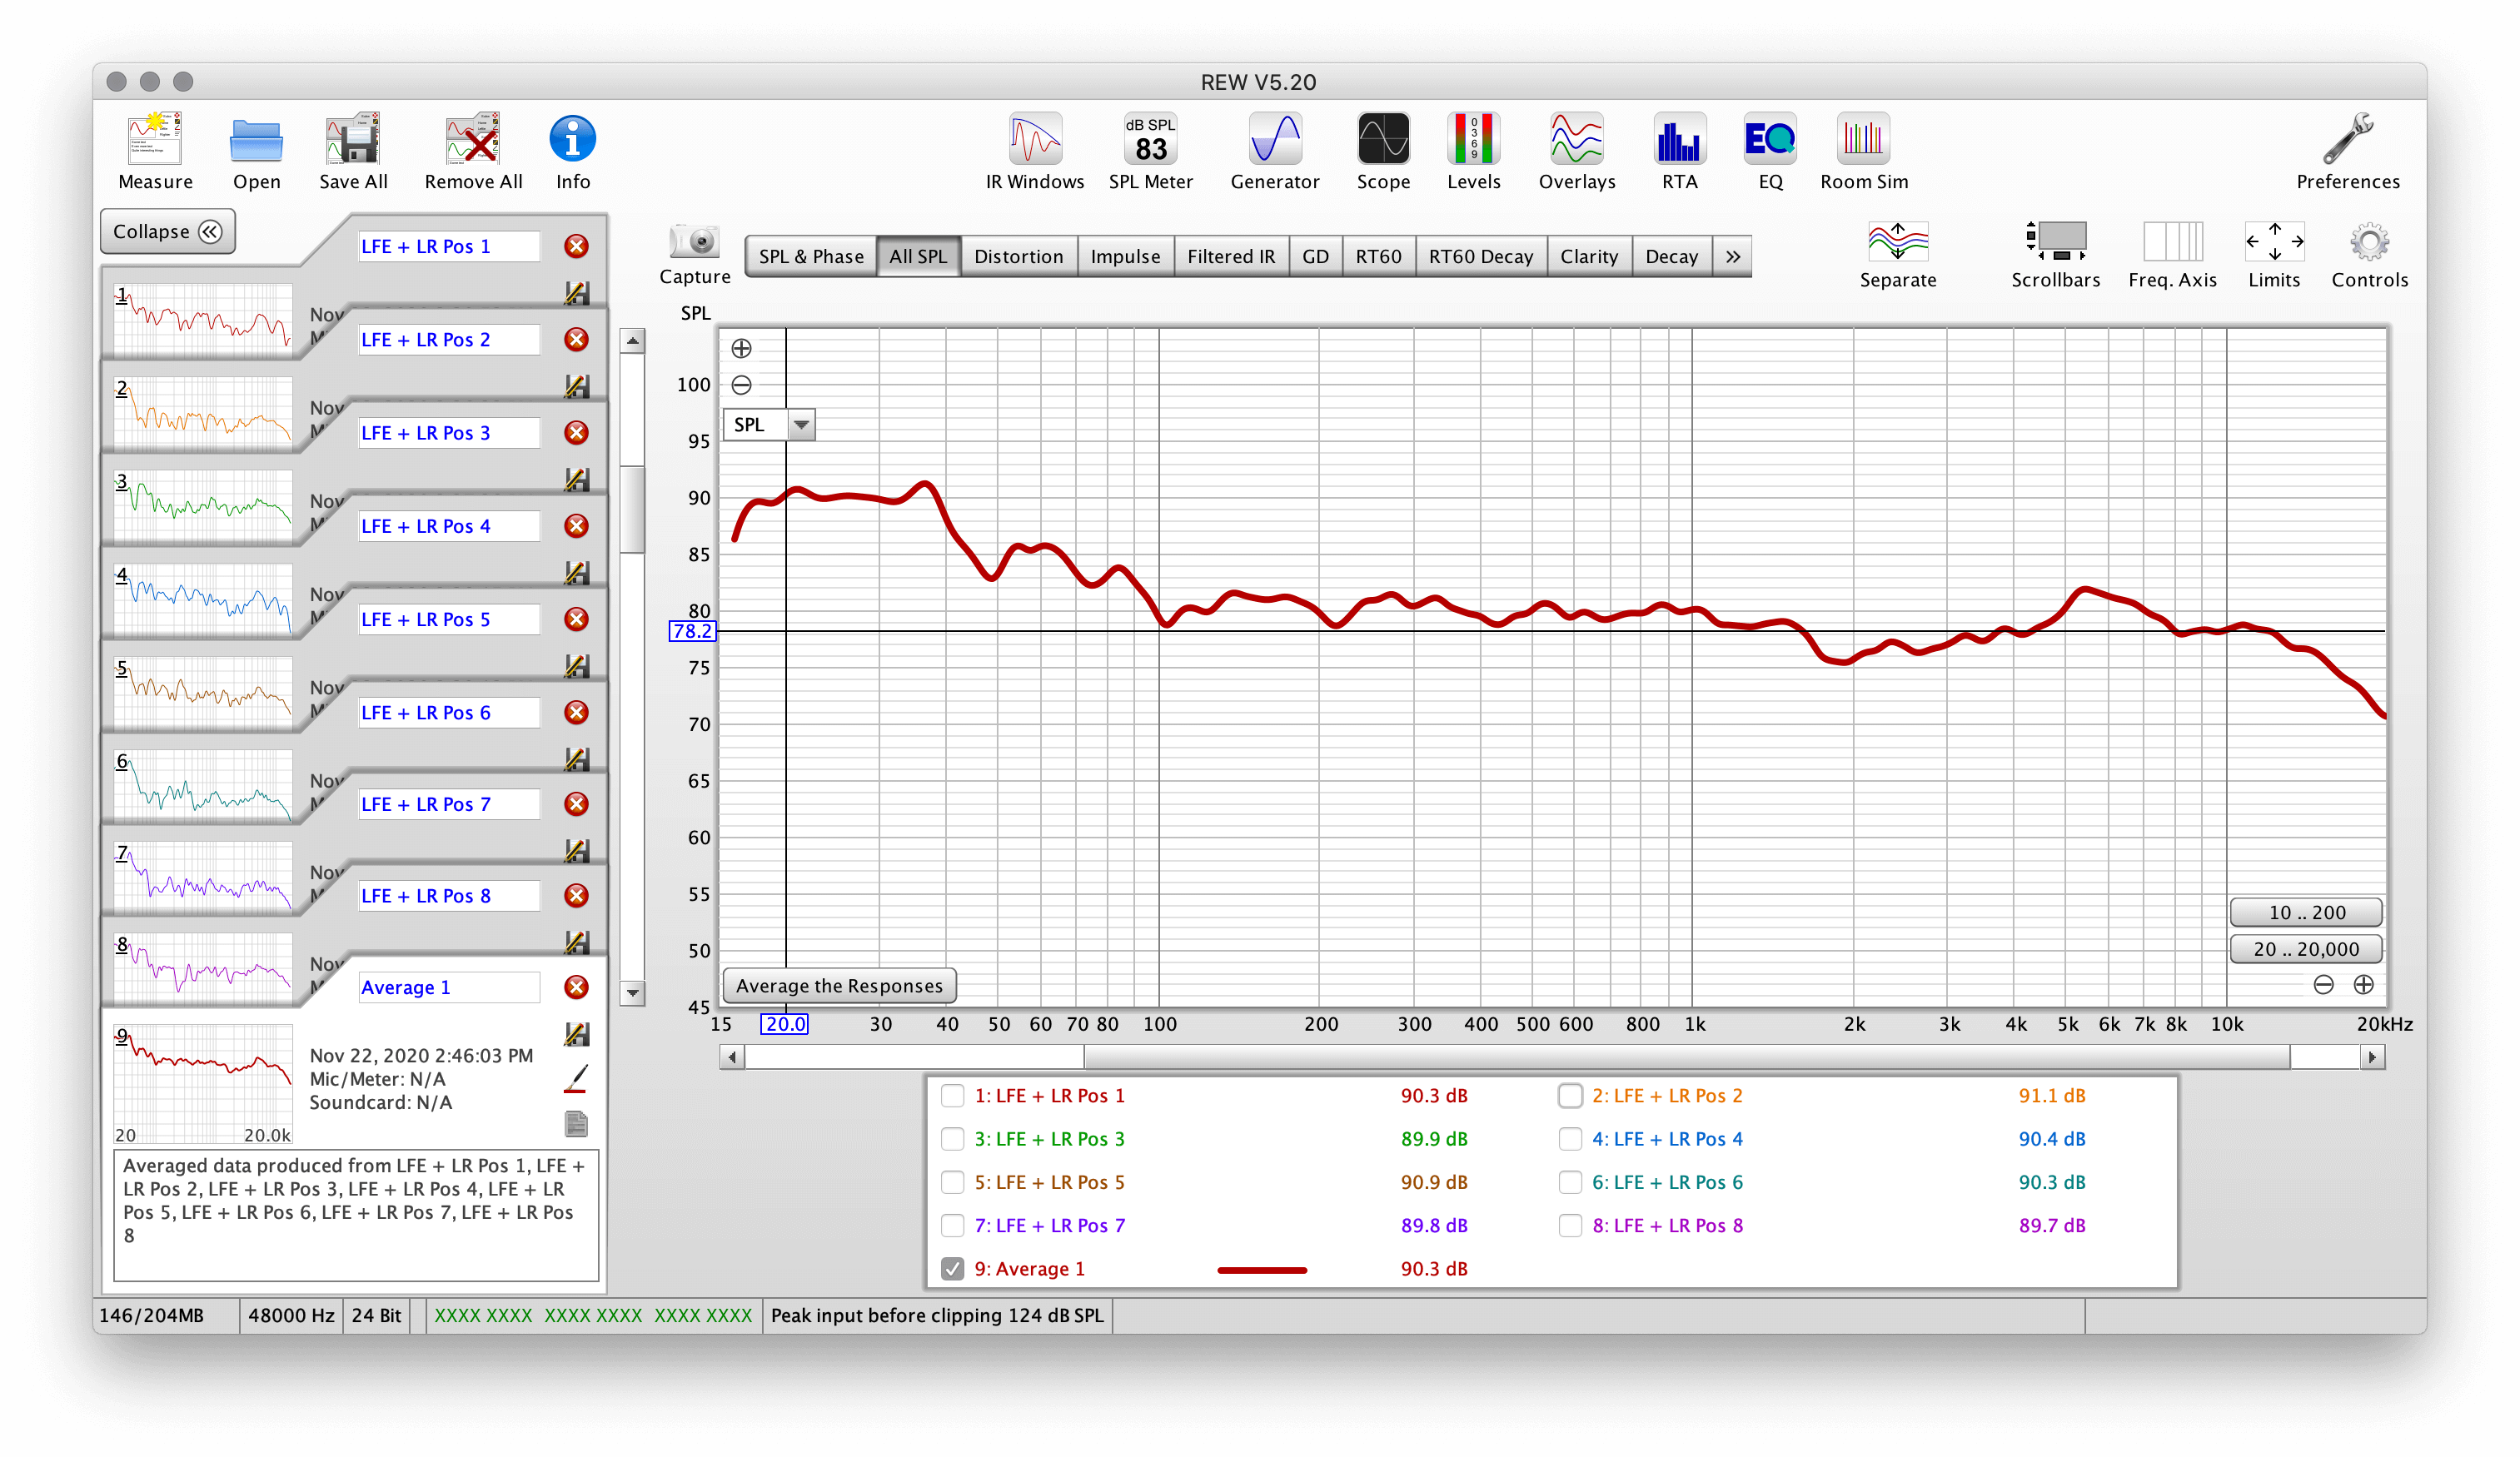
We're going to take a composite of measurements following the legend below. Note that if you only have one seat, or have a couch, or whatever combination - still follow this guide. These points are about 2ft from each other and our goal is to make a cloud of measurements. As a side note, I use the same measurement count and locations when using Audyssey as well. It is only critical that you abide by Position 1, the rest of the positions may be done in any order that is convenient.
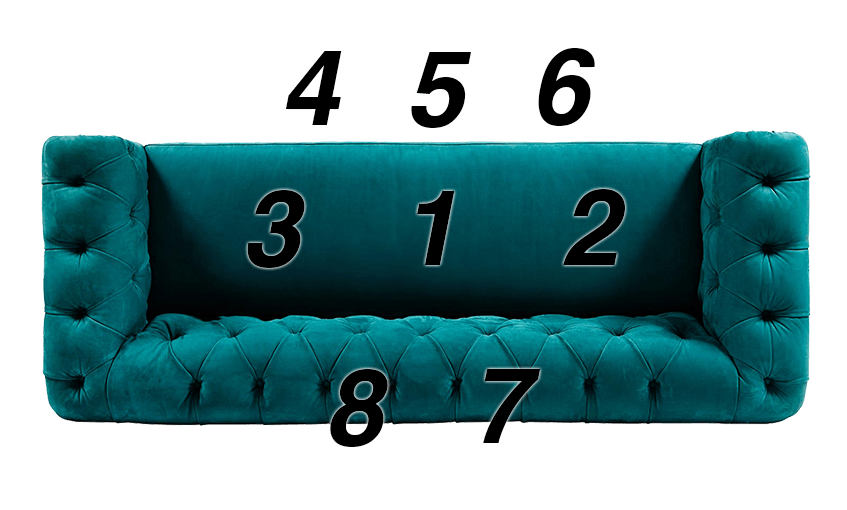
I like the pull measurements of the following as a minimum:
The most important is probably the composite cloud of points, as that's the most representative of what you'll be comparing future results against, but I still like to save the singular positions. I've never regretted taking more measurements, though. For example, getting a composite of just the LFE would be nice to have as well. So let's take some measurements:
We're going to take all eight positions, labelling each as their respective number. Once complete you'll see it's very messy!
So let's add that 1/6-th smoothing...
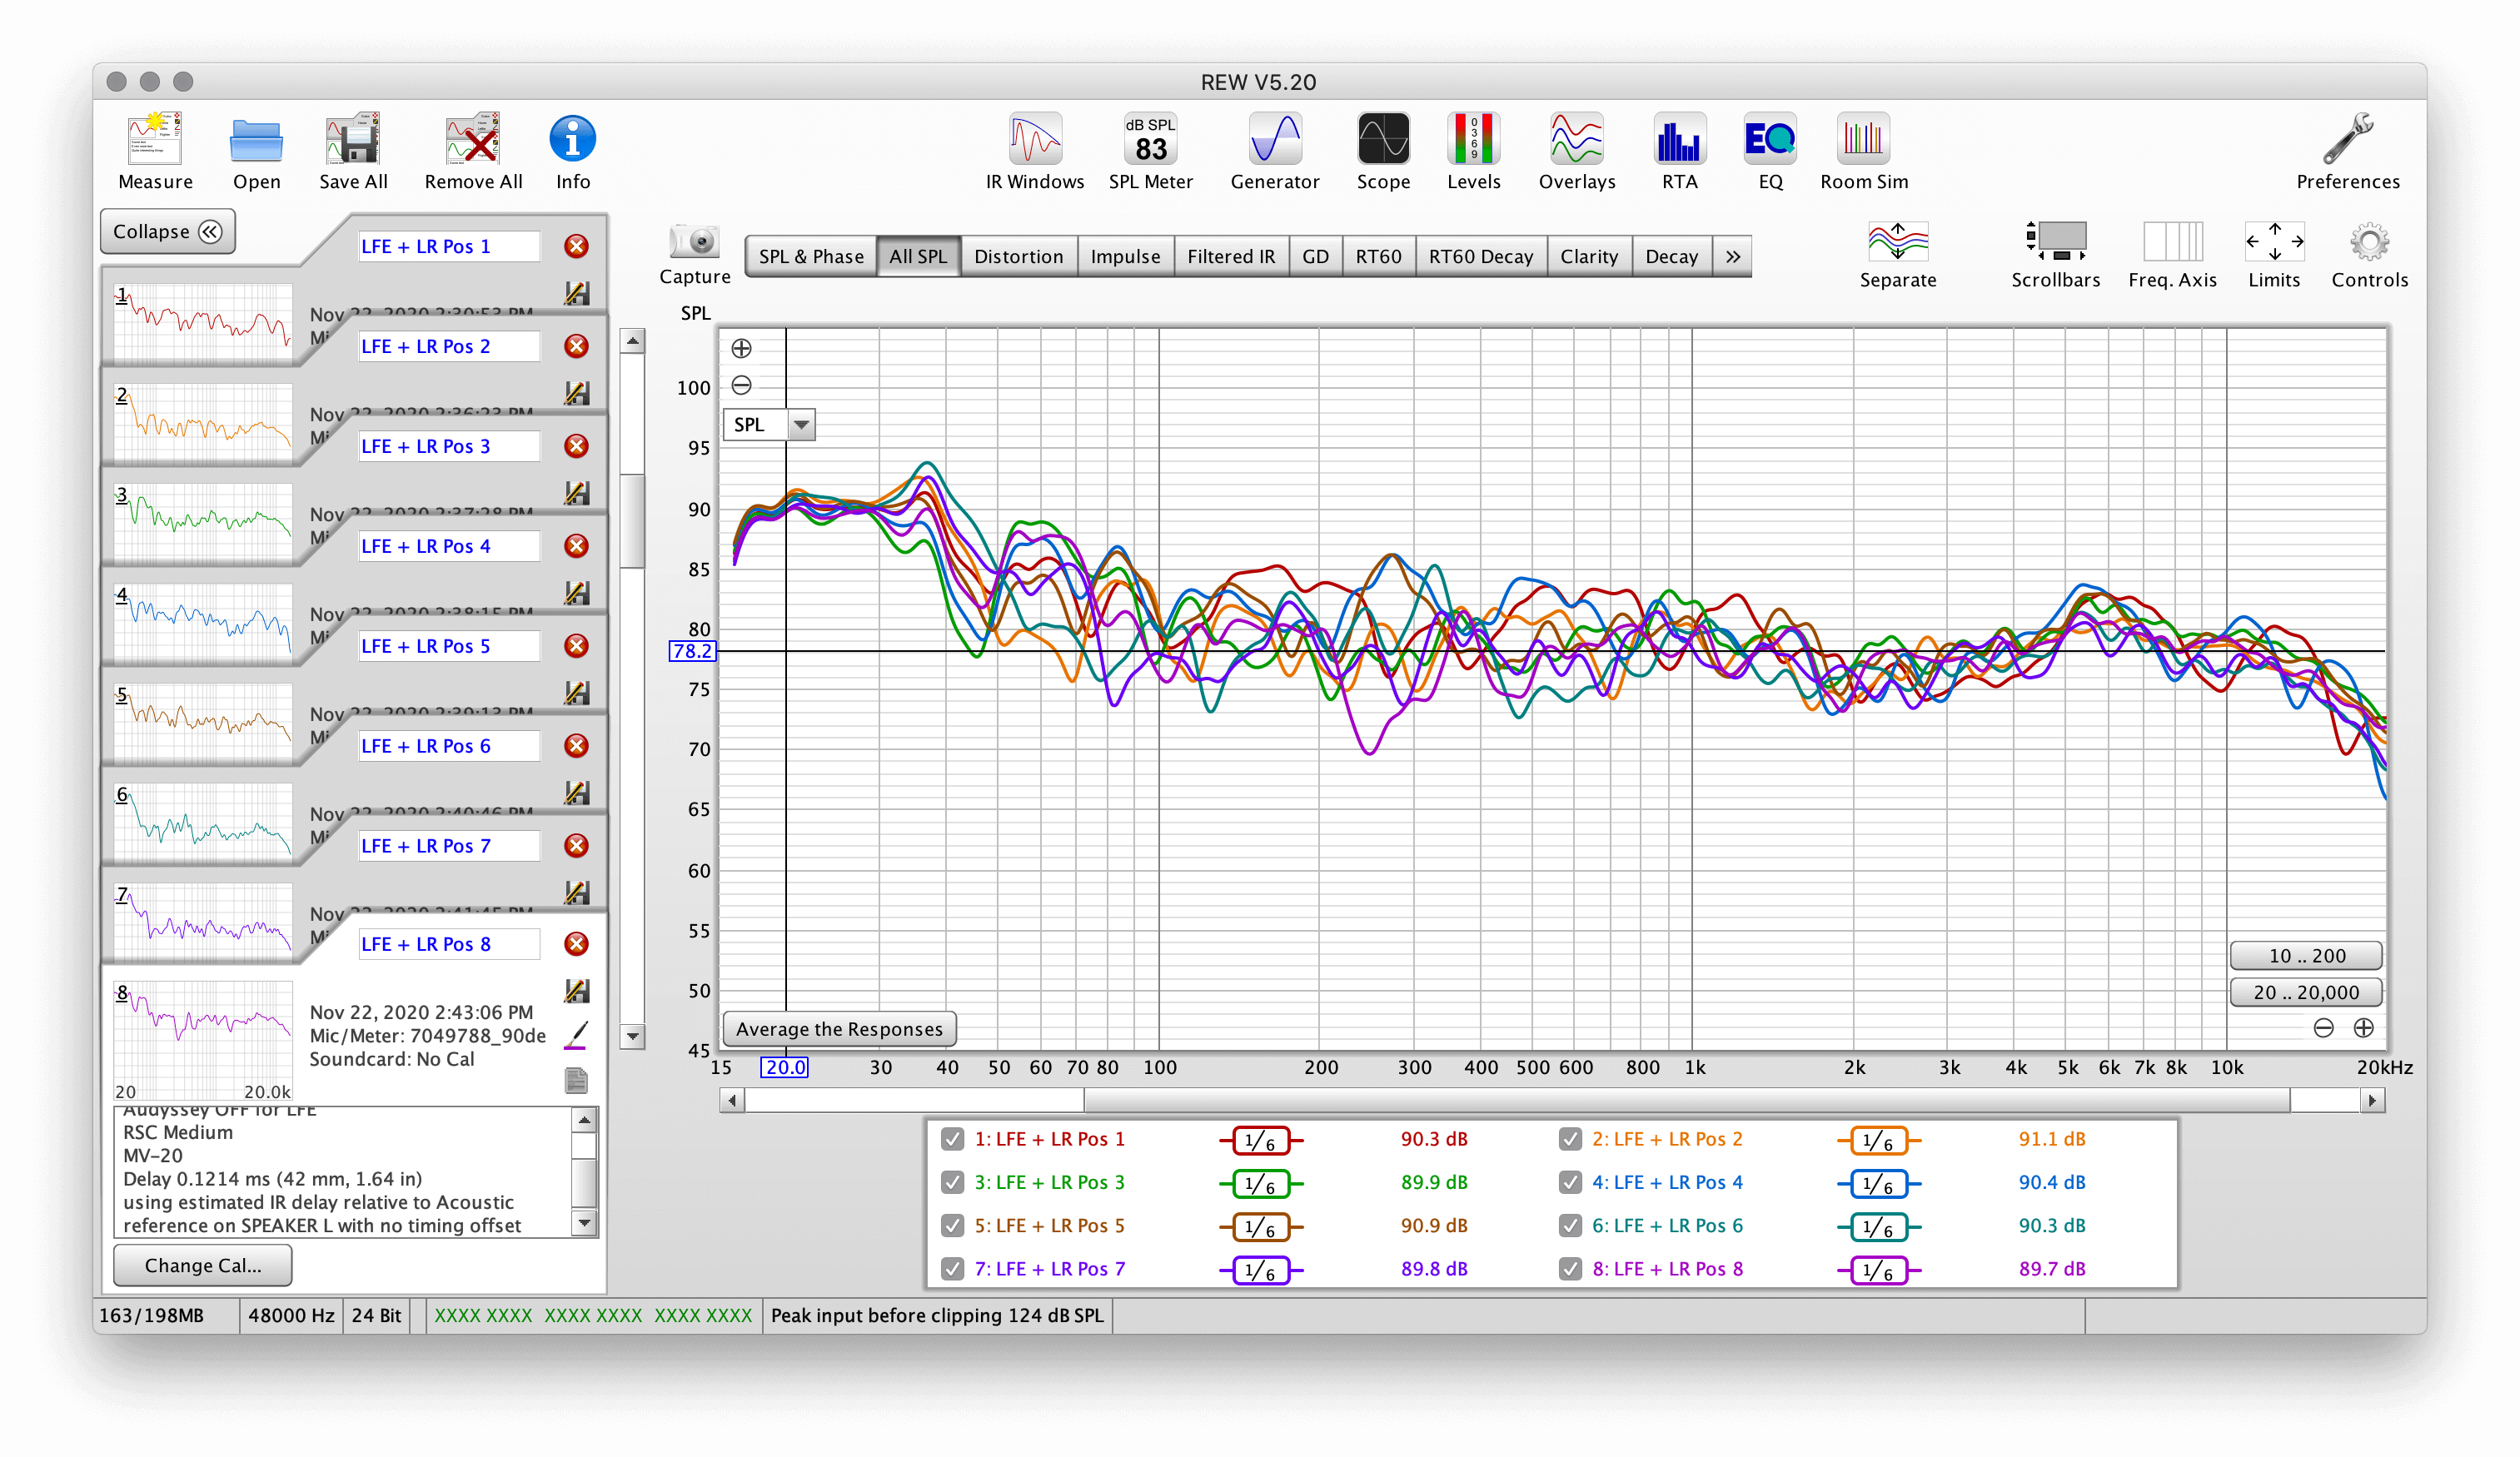
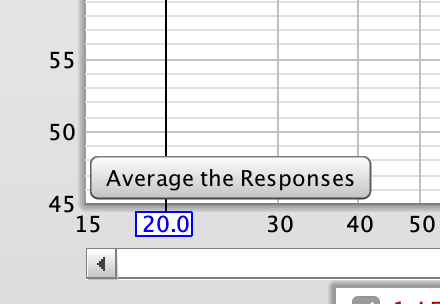
Now we want to also make an average of all those responses, our the "composite" as I call it. This can be done by clicking Average the Responses in the lower left of the graph.
We now have a composite average of the measurements taken in our point cloud.
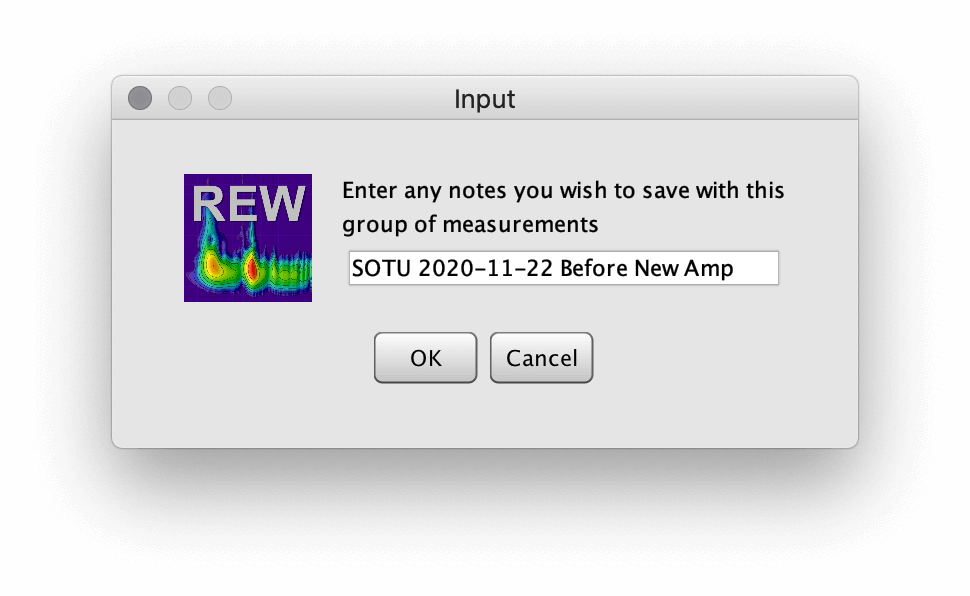
This is a good point to save. When you click "Save All," I'd also recommend adding some details in the notes. In this example, this is measurements taken before replacing an amplifier. I also often use SOTU as an abbreviation for "State of the Union" - a bit of humor that tells me "here is a snapshot of where you're at right now" in only four characters.
When the new amplifier gets swapped, we'll re-measure and see if the response changes.
You now have REW configured for taking measurements and have gathered your current state in the room. From here you may either run Audyssey or move on to EQing with REW using a MiniDSP.