Subwoofer placement and integration is a critical step to achieving natural sounding bass in your room. The best results come from having multiple subwoofers which serve to drive the sound more uniformly with fewer modal extremes. Research has been done to determine ideal placement locations in typical closed rectangular rooms, but what do those of us with oddly shaped rooms do? Like many people, I don't have a purpose-built dedicated theater room and have to make do with my living room. My living room is open to the kitchen, foyer and office - it's one big open space. This makes subwoofer placement a real challenge: There are limited locations that are possible (due to either cabling or aesthetics) and no location is predictable.
A common recommendation is to "crawl for bass", where you place a subwoofer in your chair and then crawl around the room playing sweeps to see where the bass sounds the most even. The problem with this technique is its imprecision and, when dealing with multiple subwoofers, lack of ability to see how multiple positions stack up together. We want to find which positions, when combined, will EQ most gracefully. Sometimes that means two positions that have some pretty uneven sounding bass on their own might summate into something very even.
This guide shows a technique of determining the best placements in such a space by measuring one subwoofer at many different potential locations in the room, and then using analysis to determine which combination of locations will be best if using multiple subwoofers. I will be using a very manageable JL Audio E110 10" subwoofer for this process. It's a lot smaller than the subwoofers this was used to prepare for, but it is still a sealed design so the results will be valid enough. Ideally you'll want to use the exact subwoofer you plan to use in pairs. If it is very heavy, I recommend using furniture sliders (which are available for both carpeted and hard floors).
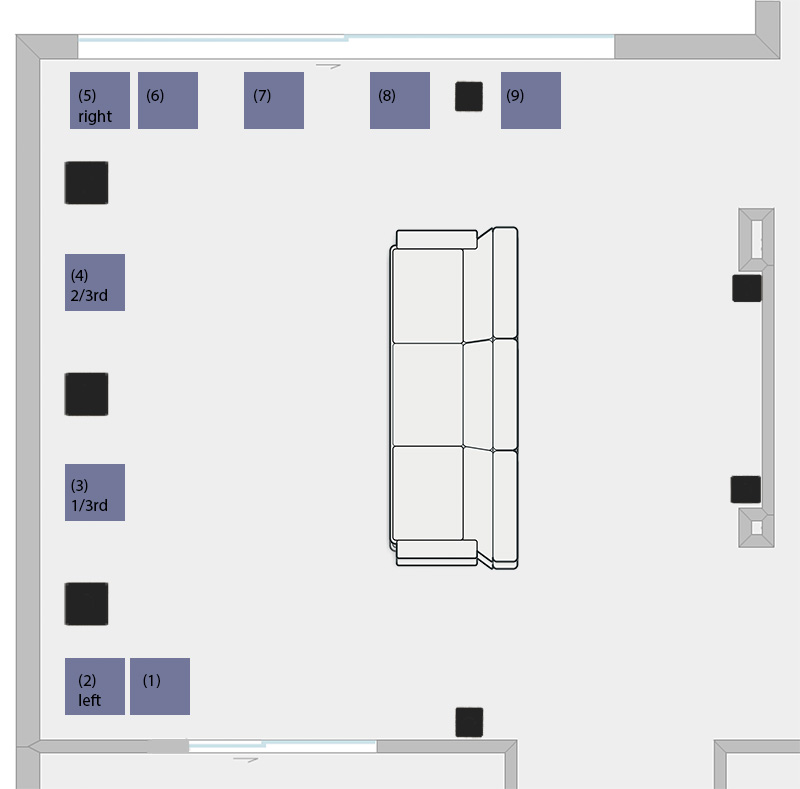
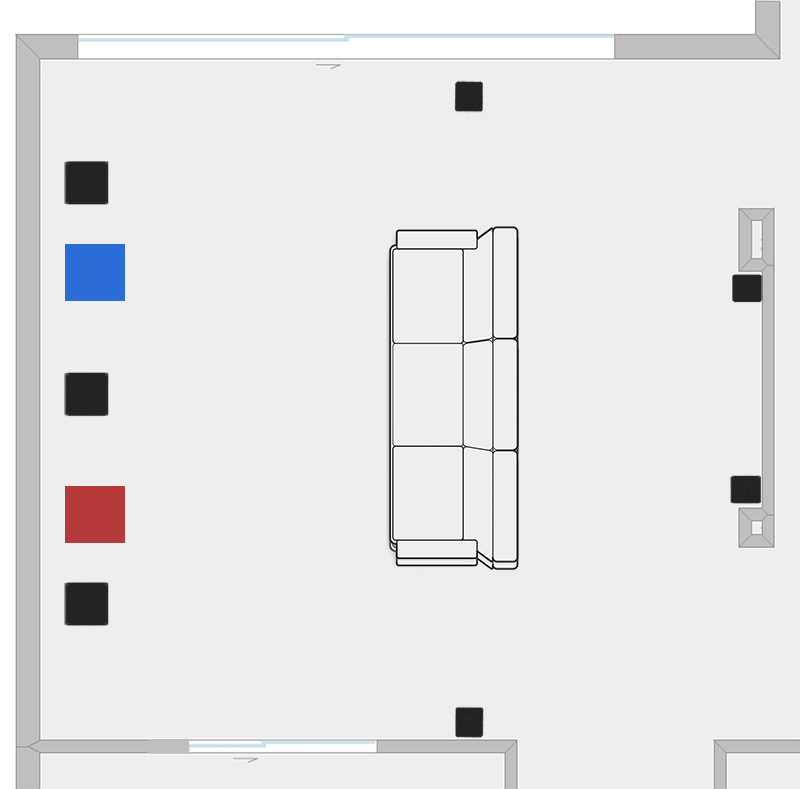
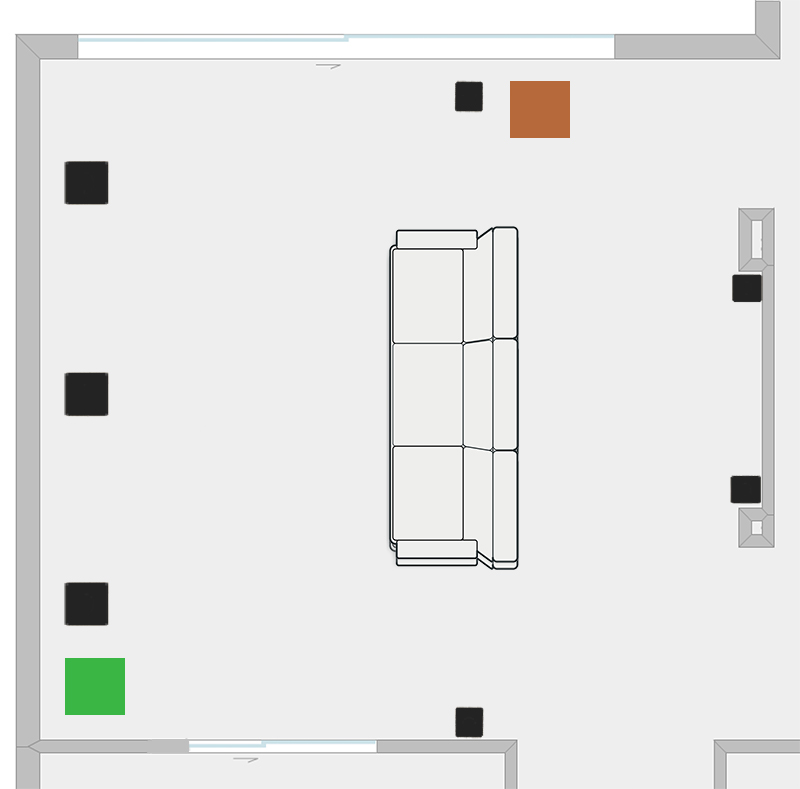
The first step is to make a little drawing of your room and label/number each location that you could place a subwoofer. These are locations that are both aesthetically acceptable and have the ability to get a power and signal cable to them.
There are some logical places to try. We know, for example, that corners, midpoints, thirds (along walls), and quarters (along walls) are a useful place to try. Here are the available locations in my living room:
For this test you will need a long RCA or XLR cable so that you can quickly connect the subwoofer being moved. If power isn't immediately available by each location, use an extension cable.
You have two options for measuring: Just measure the main listening position or measure a point cloud. The latter obviously takes a lot longer but is more useful if you want to analyze a lot of different seats. For this example, we're just going to do the main listening position as a composite of all positions is essentially the same process just with more data.
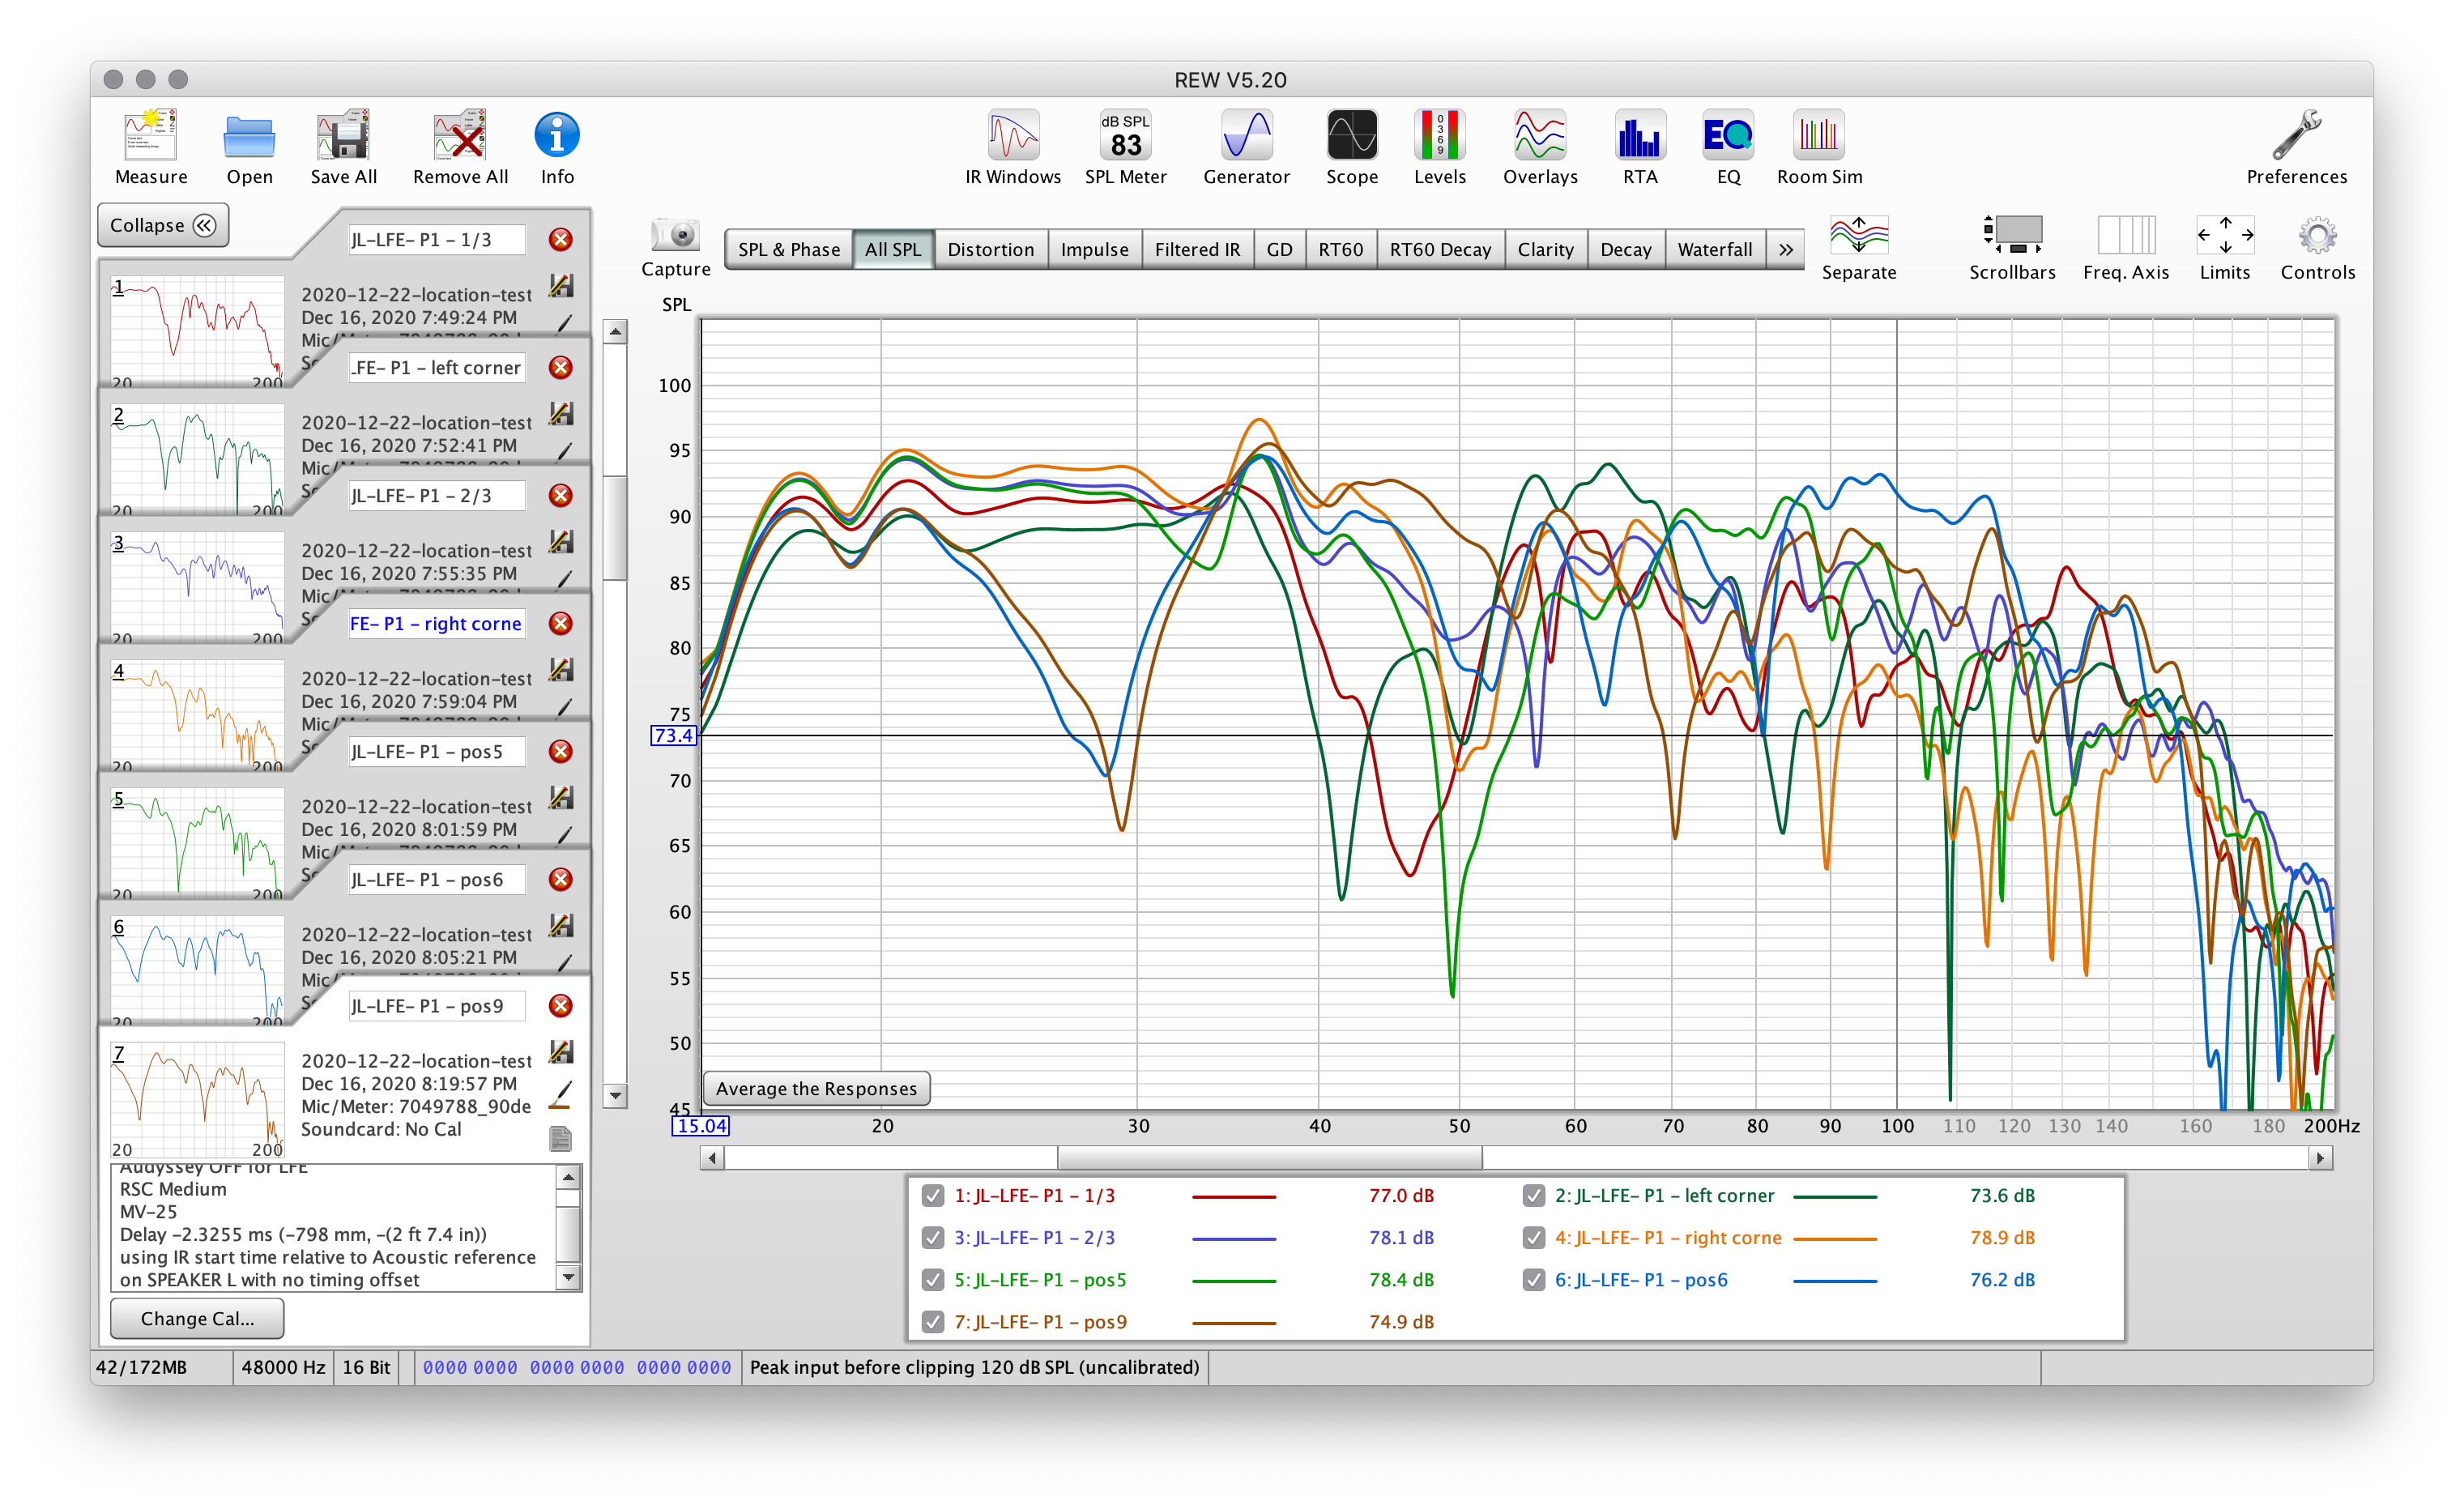
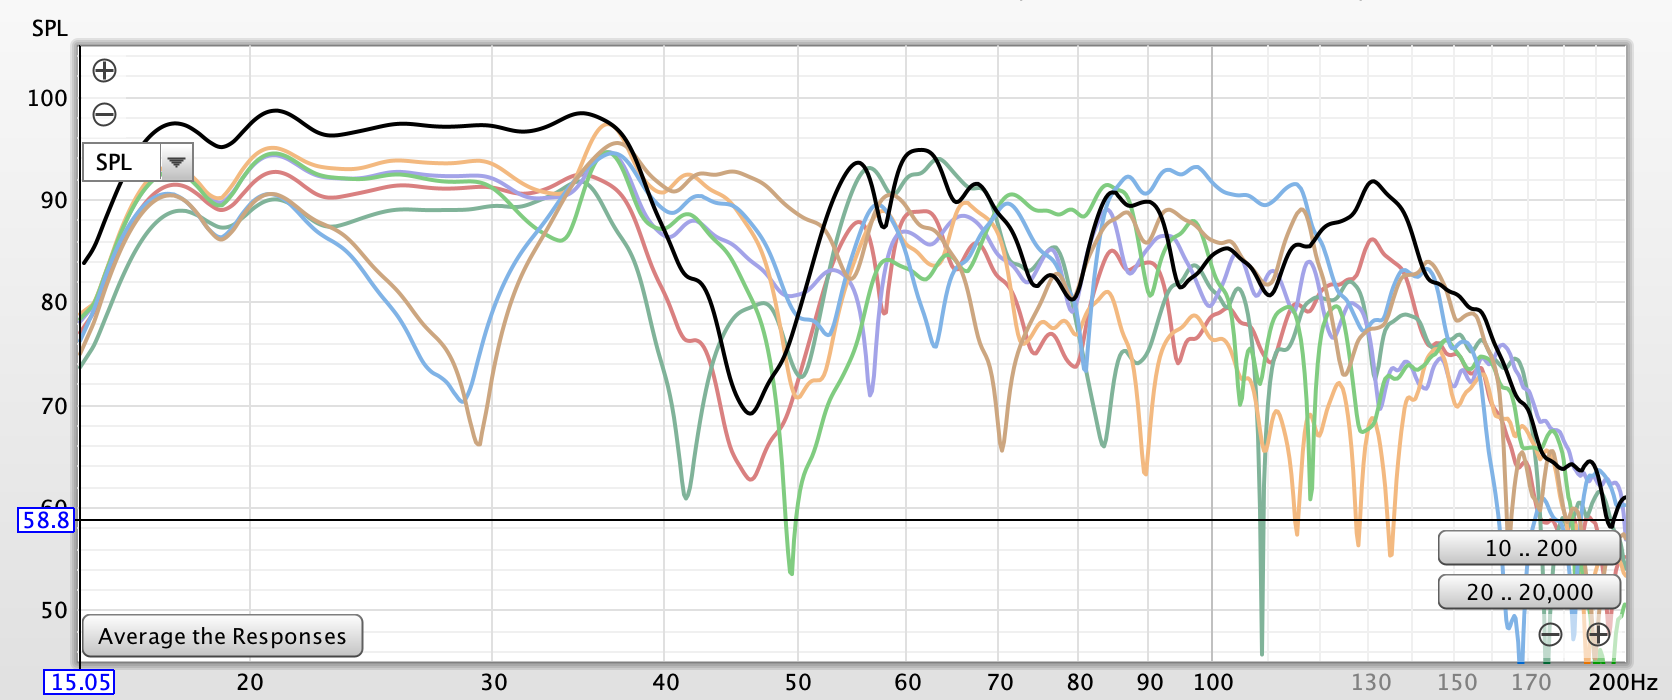
Moving the subwoofer to each location, take a sweep within REW, labelling each accordingly. When complete you should have something like this:
Next we want to sum the various combinations to see which gives us the most even response. For a basic summation, we can use the Trace Arithmetic tool, but we also want to add delays and adjust the gain, so we'll be using REW's Alignment Tool. Make sure each individual measurement is loaded, but it does not matter which is selected as the tool will allow us to choose within it.
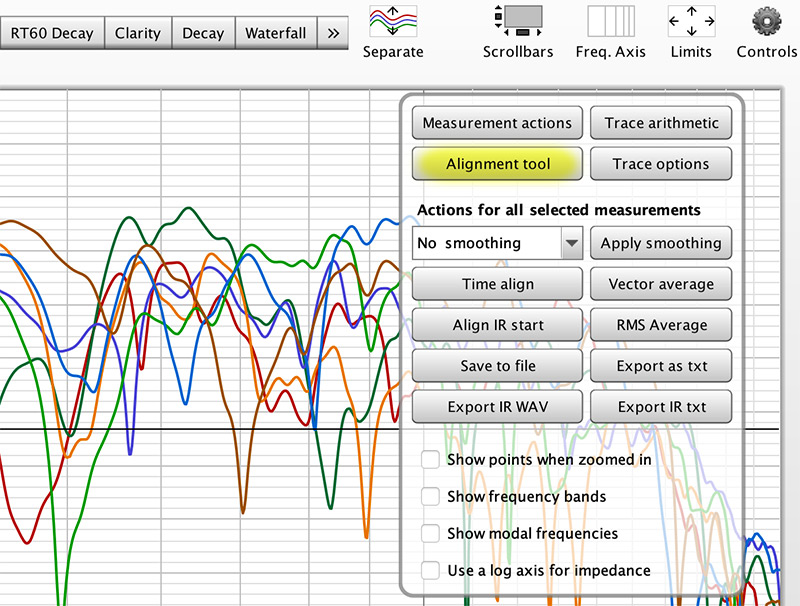
To access the Alignment Tool, we're going to select Controls
![]()
...followed by Alignment Tool
When the Alignment Tool window appears, you'll see the ability to select two different measurements (it will default both selections to the first measurement in your list). Below each measurement selection you'll see a Gain, Delay and Polarity setting.
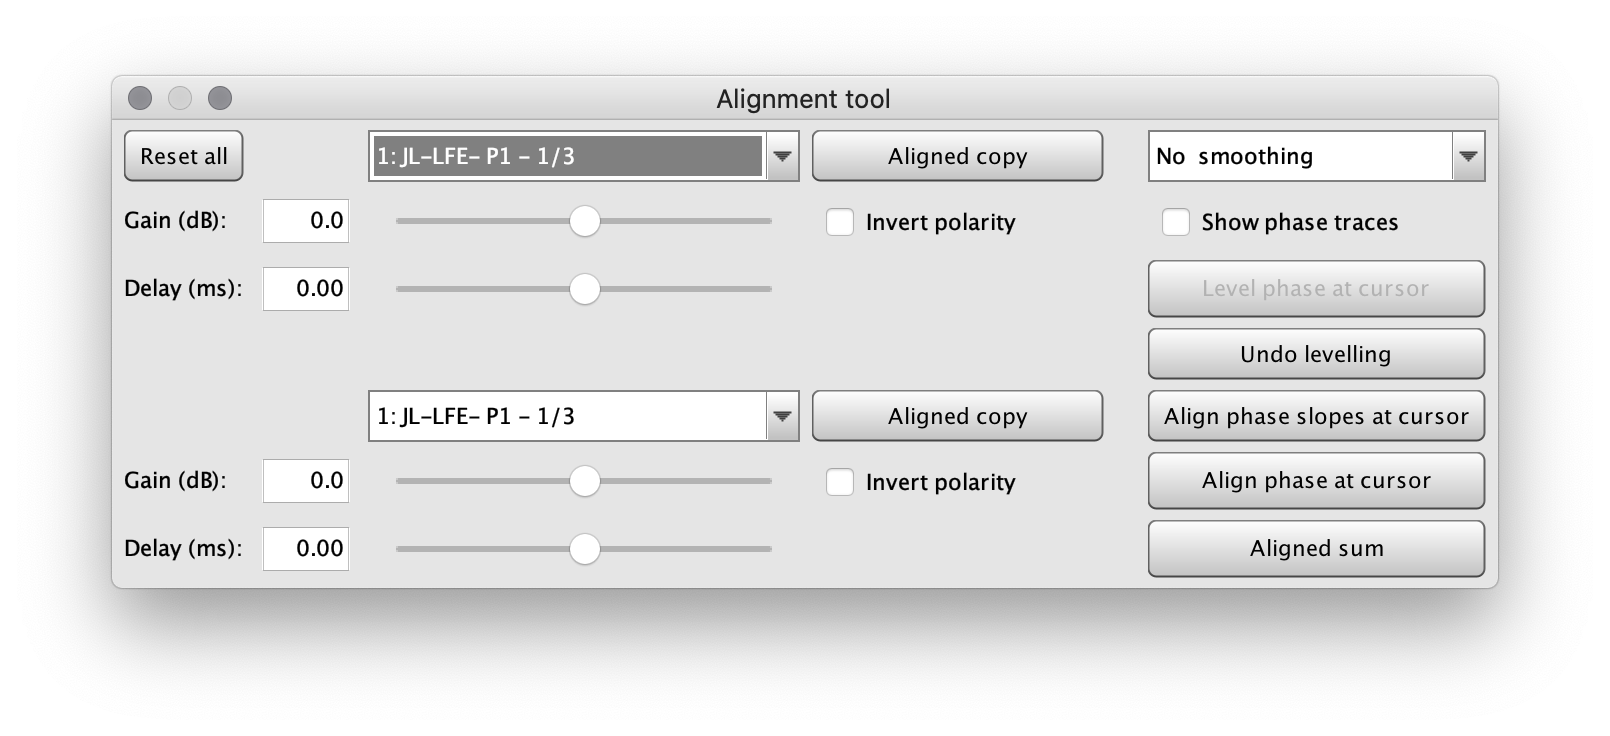
If you look at the All SPL main window, you'll also see a black line. As we select different combinations of locations, this black line will react to our selection as well as how we manipulate the gain and delay.
Now we can start to see how different locations sum by using the drop-down box to choose various locations.
Our first stop is the 1/3rd and 2/3rd along the wall placement, which looks like this:
We can see how the black summation line reacts.
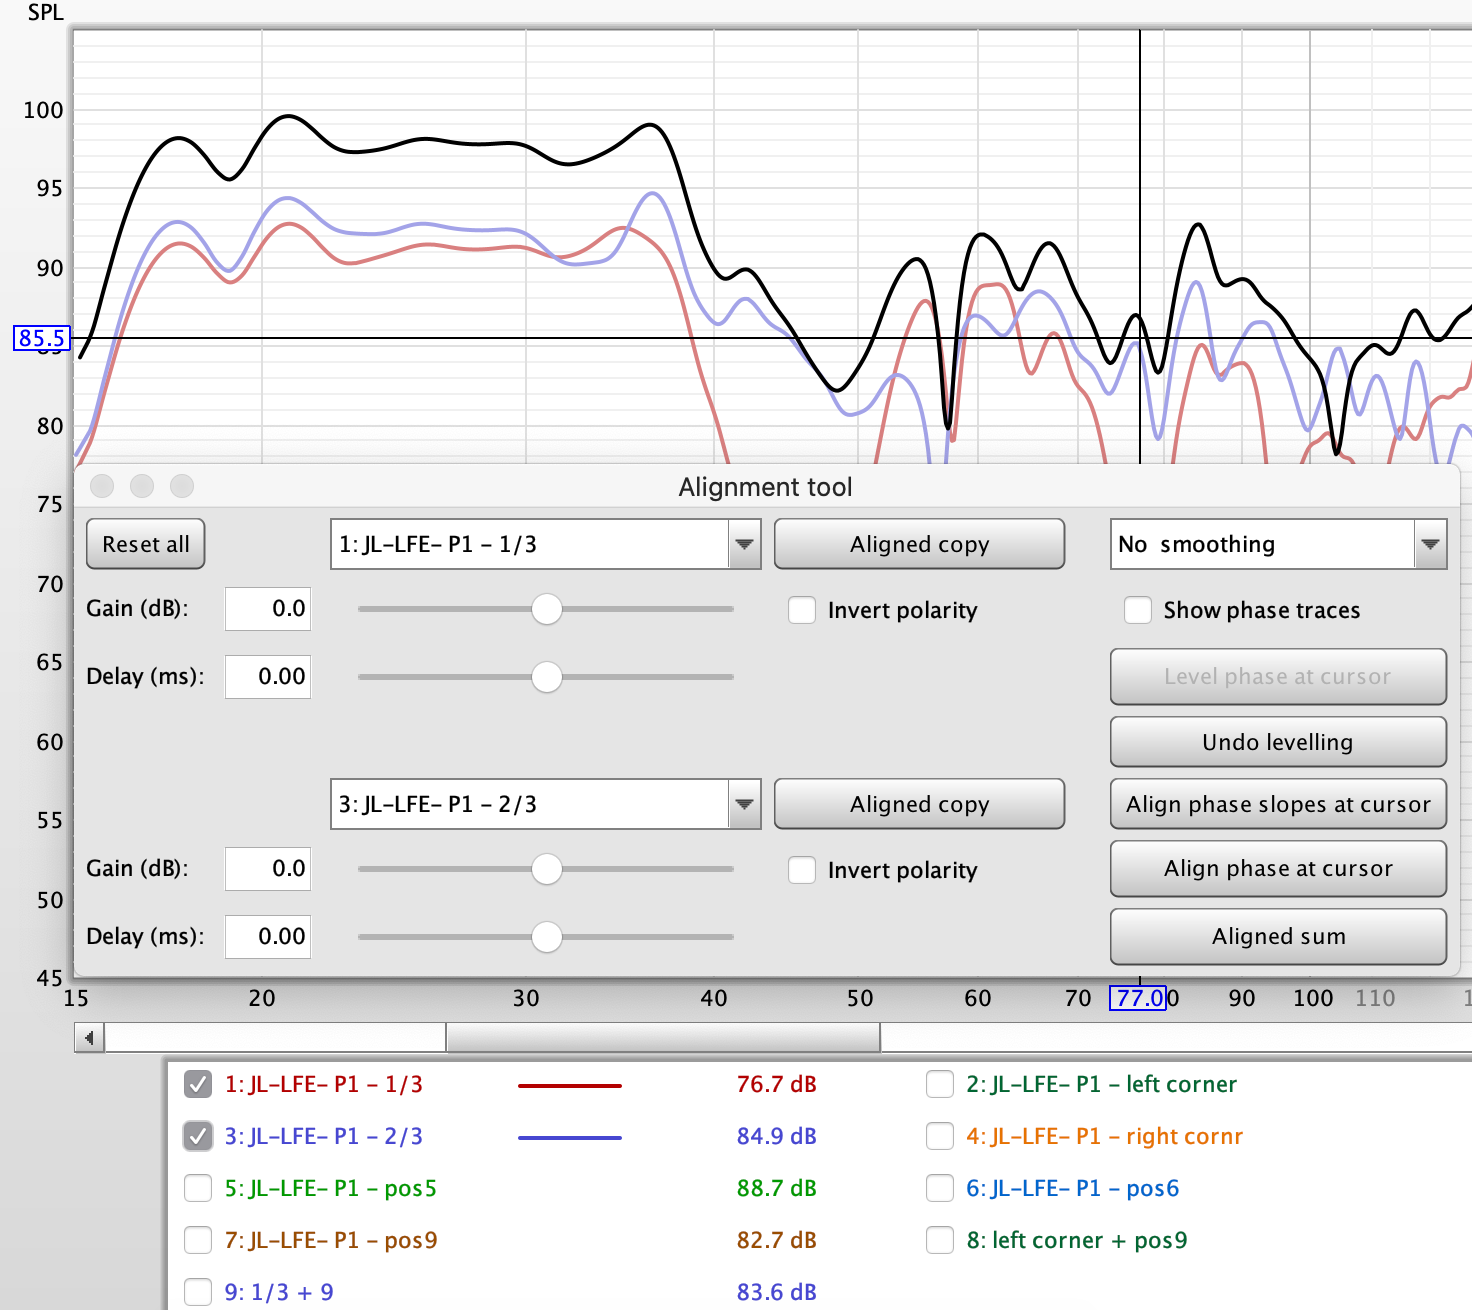
Notice above I also hide the measurements not being aligned, so we can see the black line versus the individual measurements. The 1/3rd placement is red, and the 2/3rd is blue (corresponding with the layout diagram above). These subwoofers are all on the same plane, so adjusting the delay doesn't help the response because they are naturally time aligned. Where things get a bit interesting is when selecting one of the front wall locations combined with a rearward location. So let's try the 1/3rd position combined with Position 9 (the right rear of the listening space).
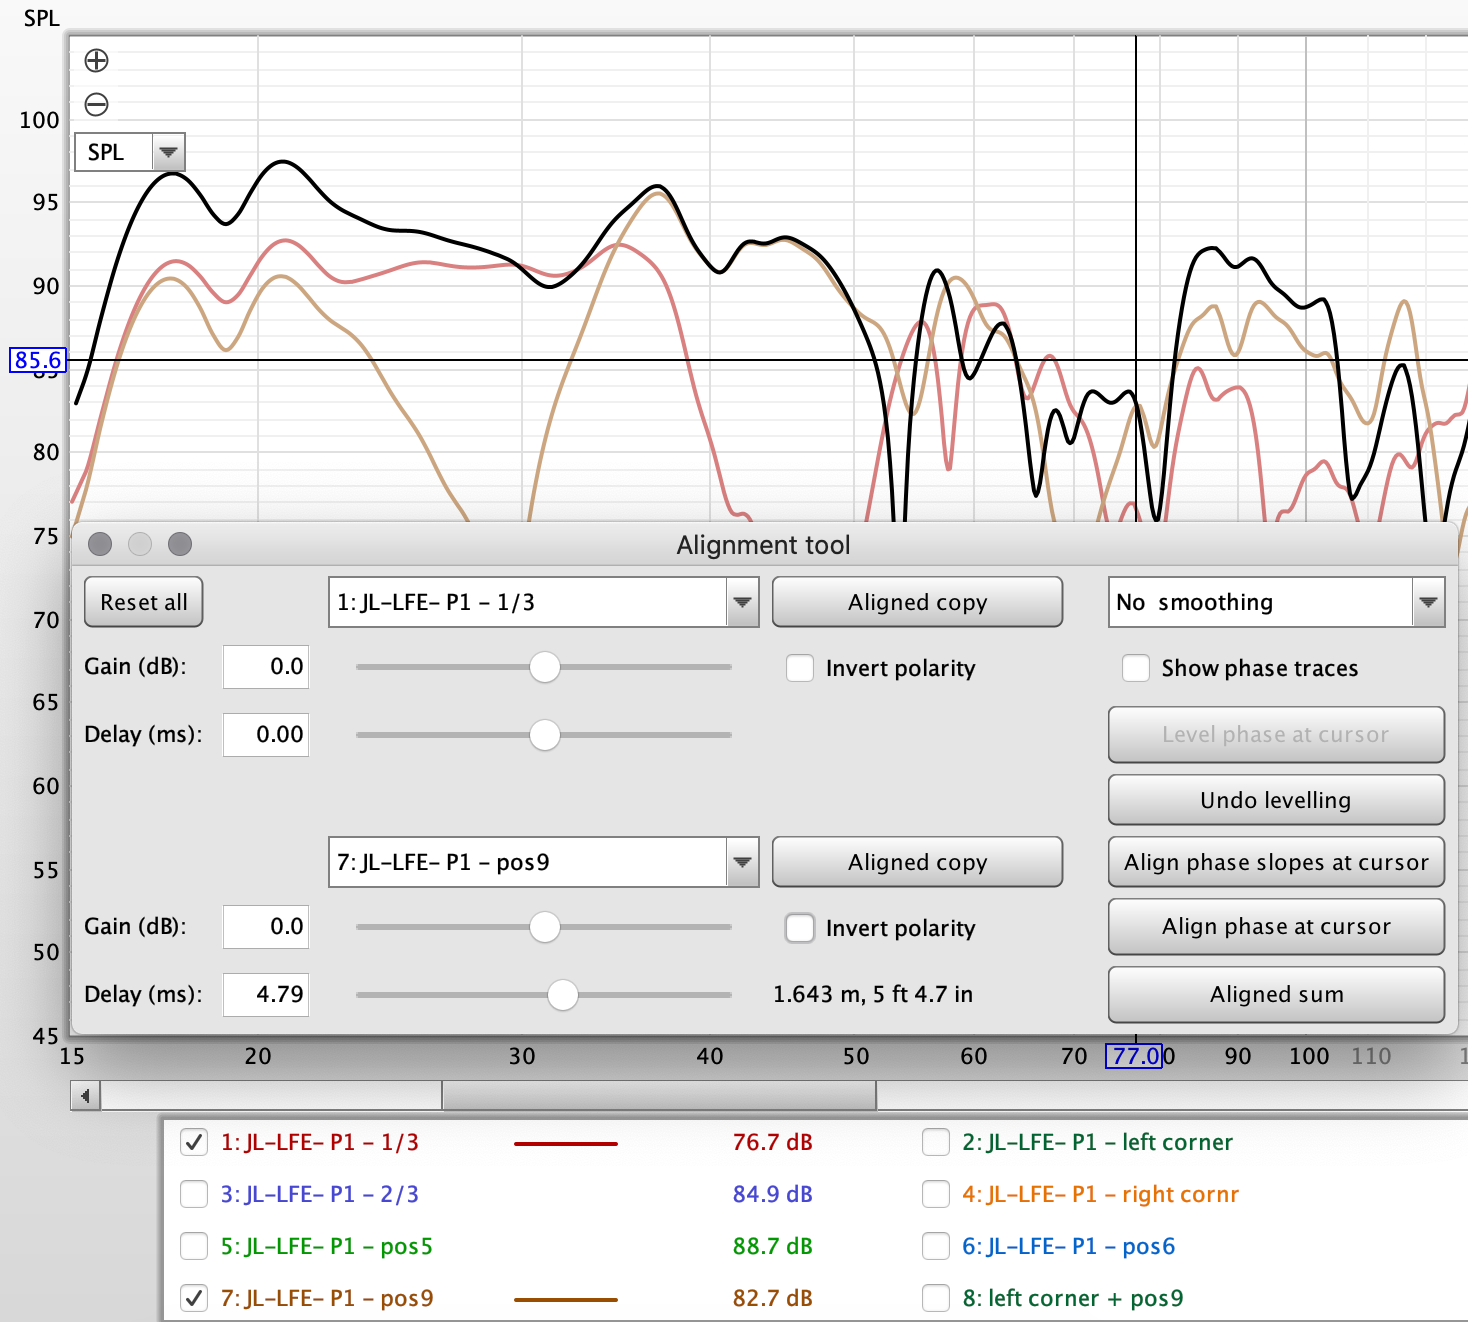
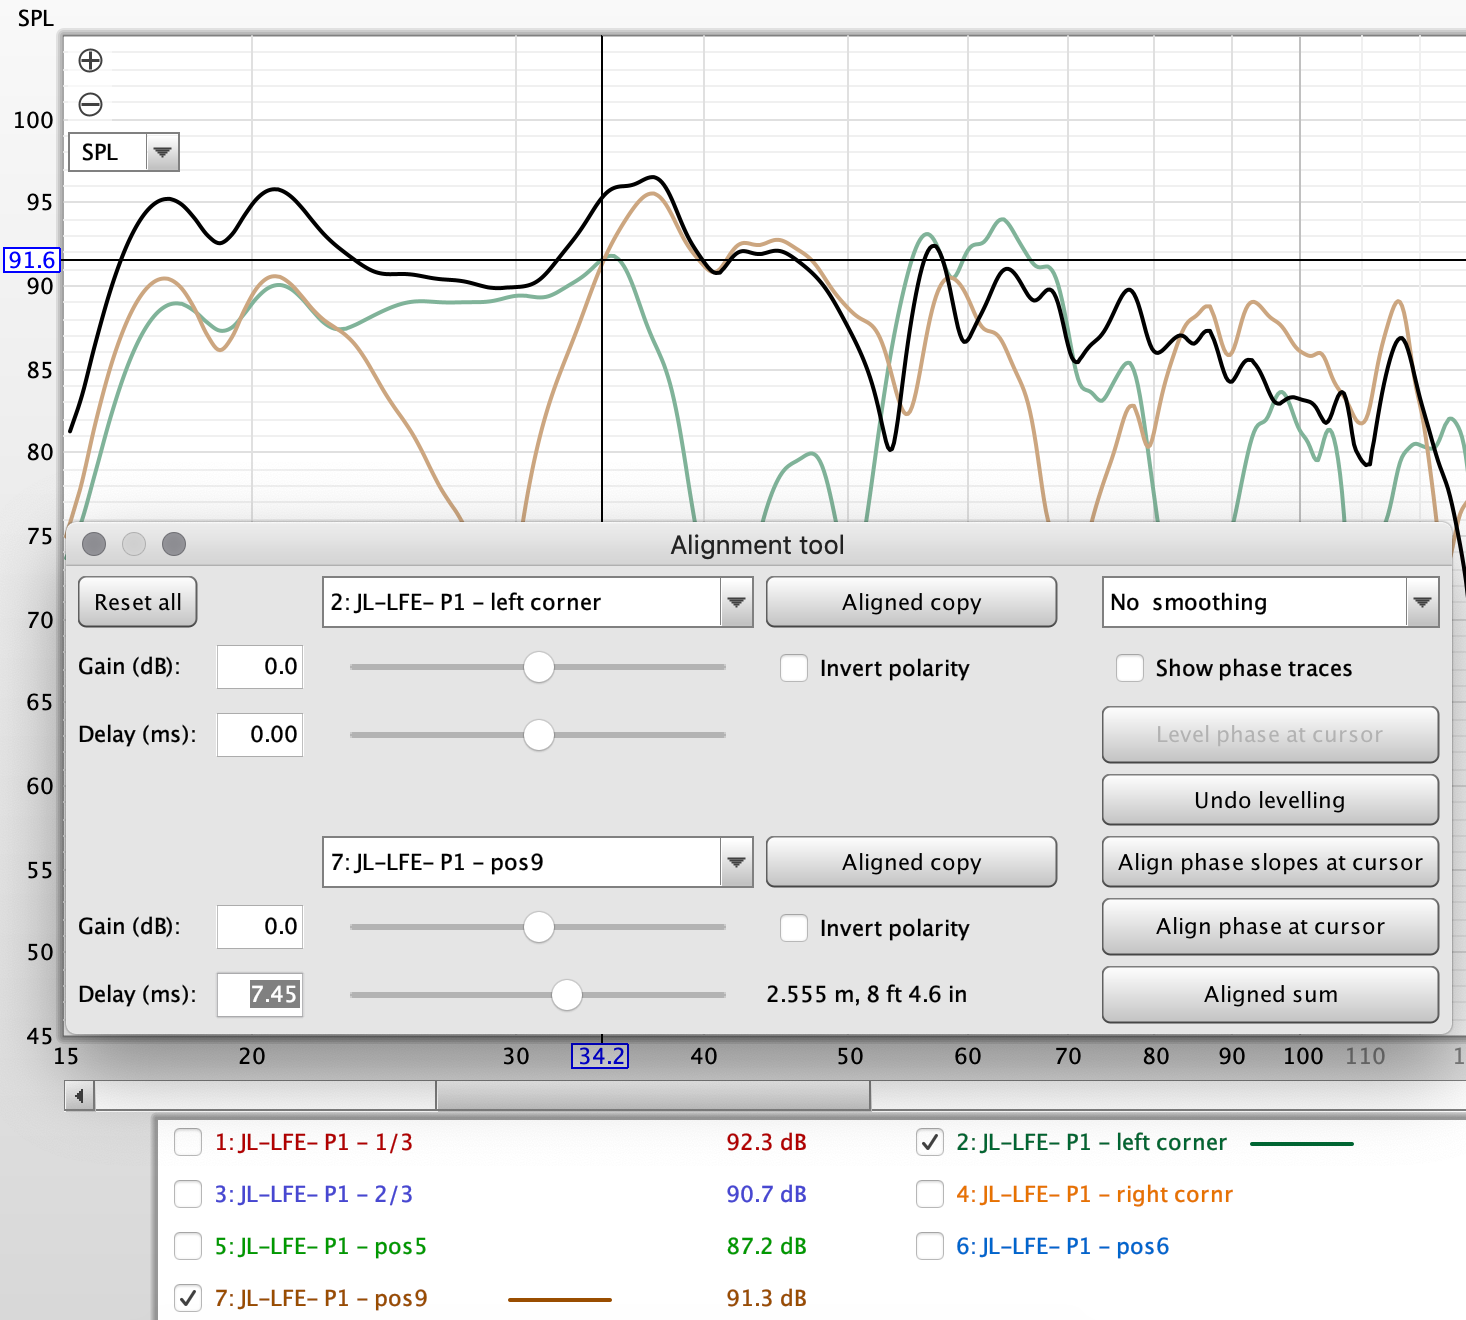
Now we know the difference between the subwoofers in distance is about 4ft, so I can add that amount of delay to the rear subwoofer (Position 9) and see if the response improves.
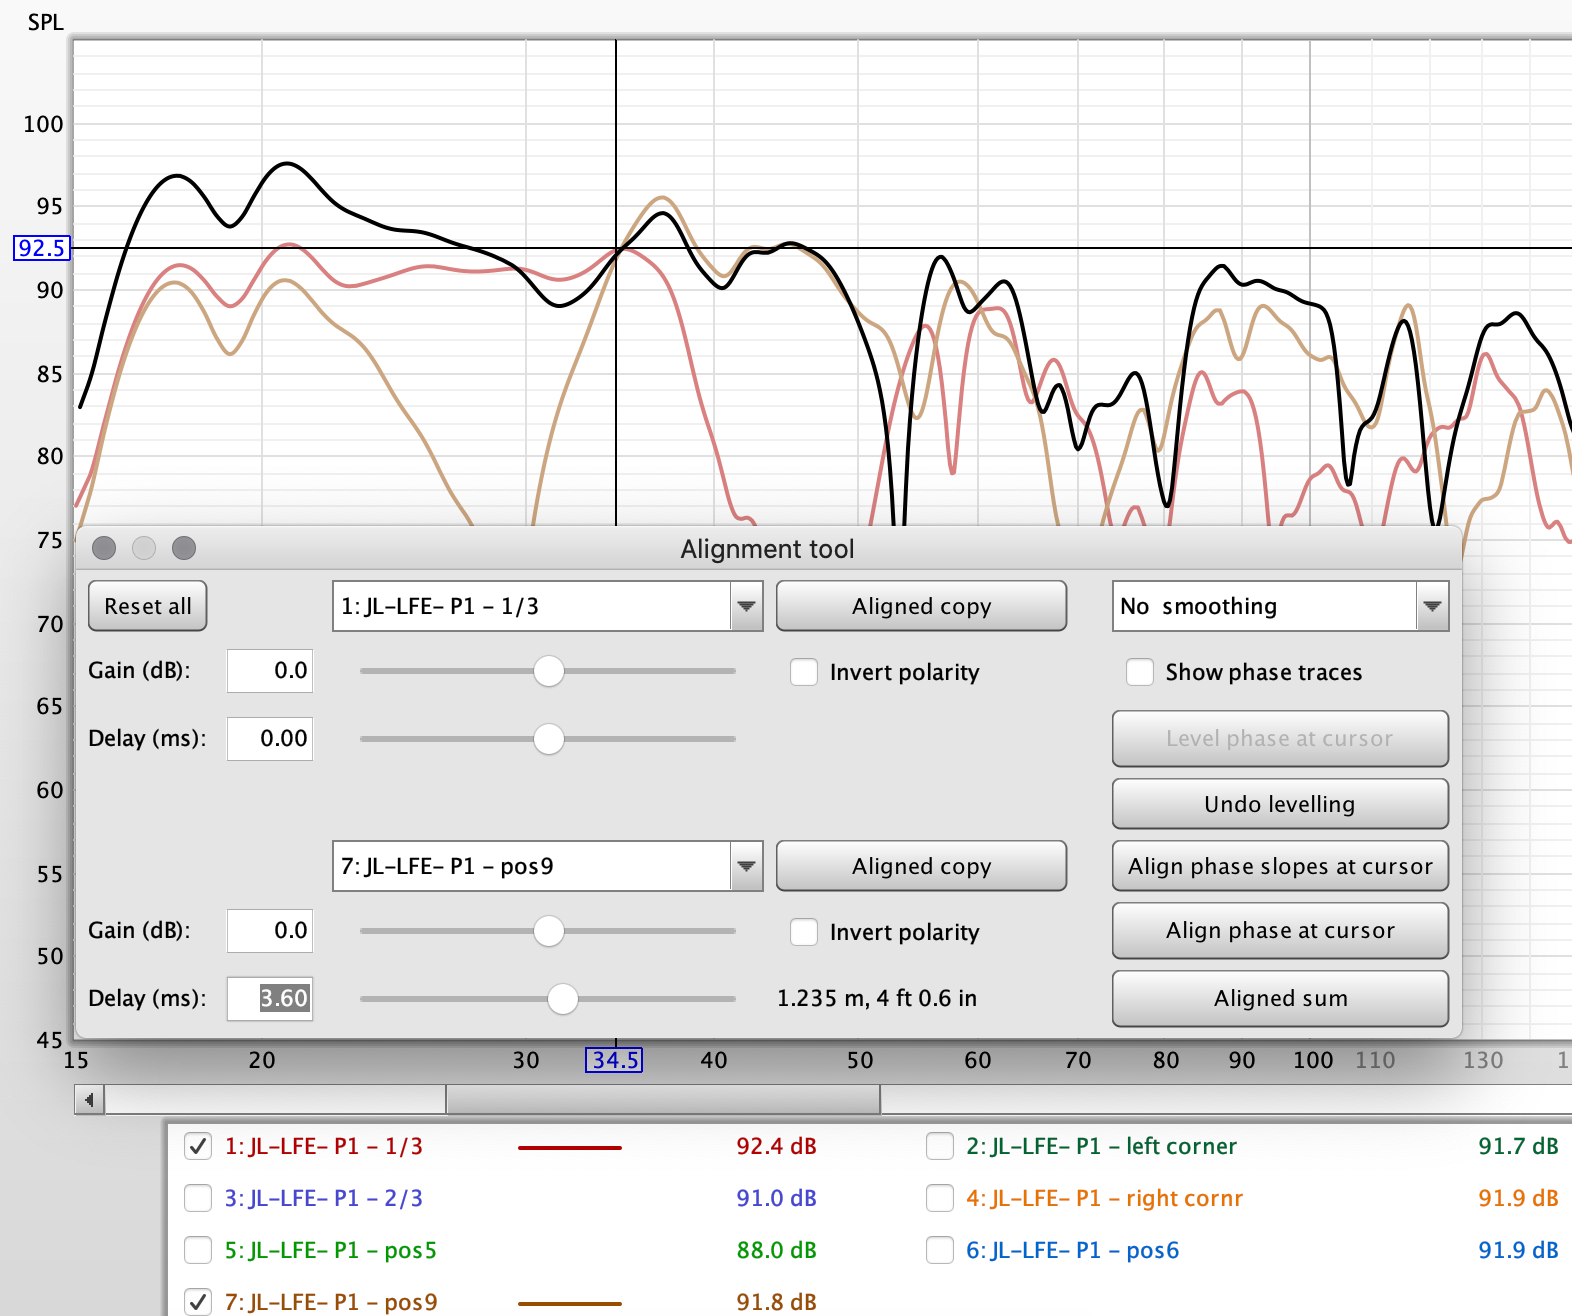
We can see that adding the delay did help smooth things a bit. Adjusting the slider we can see how tiny adjustments change various zones of the summation. Notice that sometimes a certain range will get better while another will get worse.
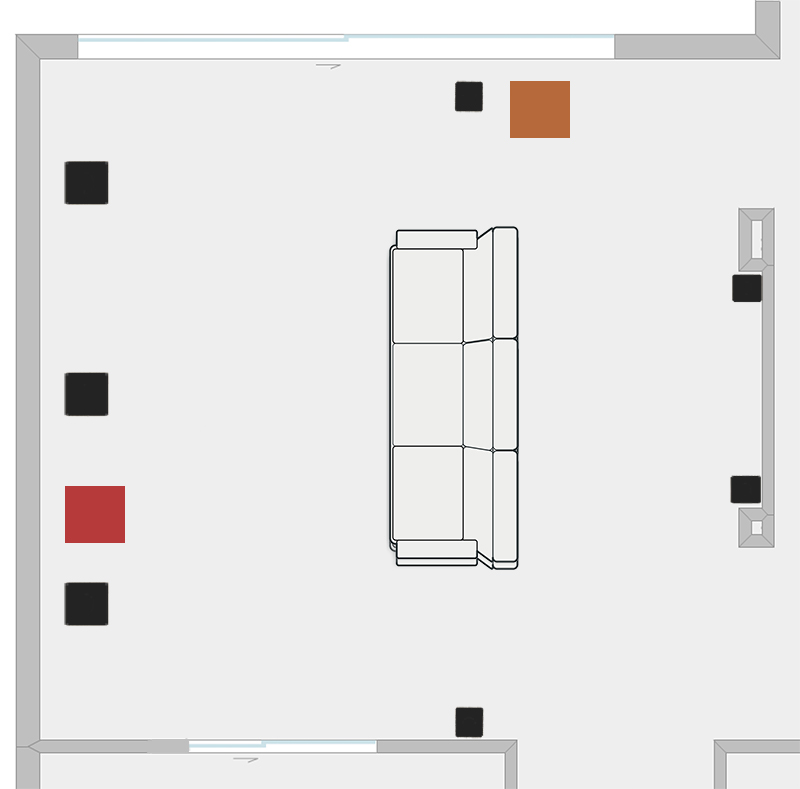
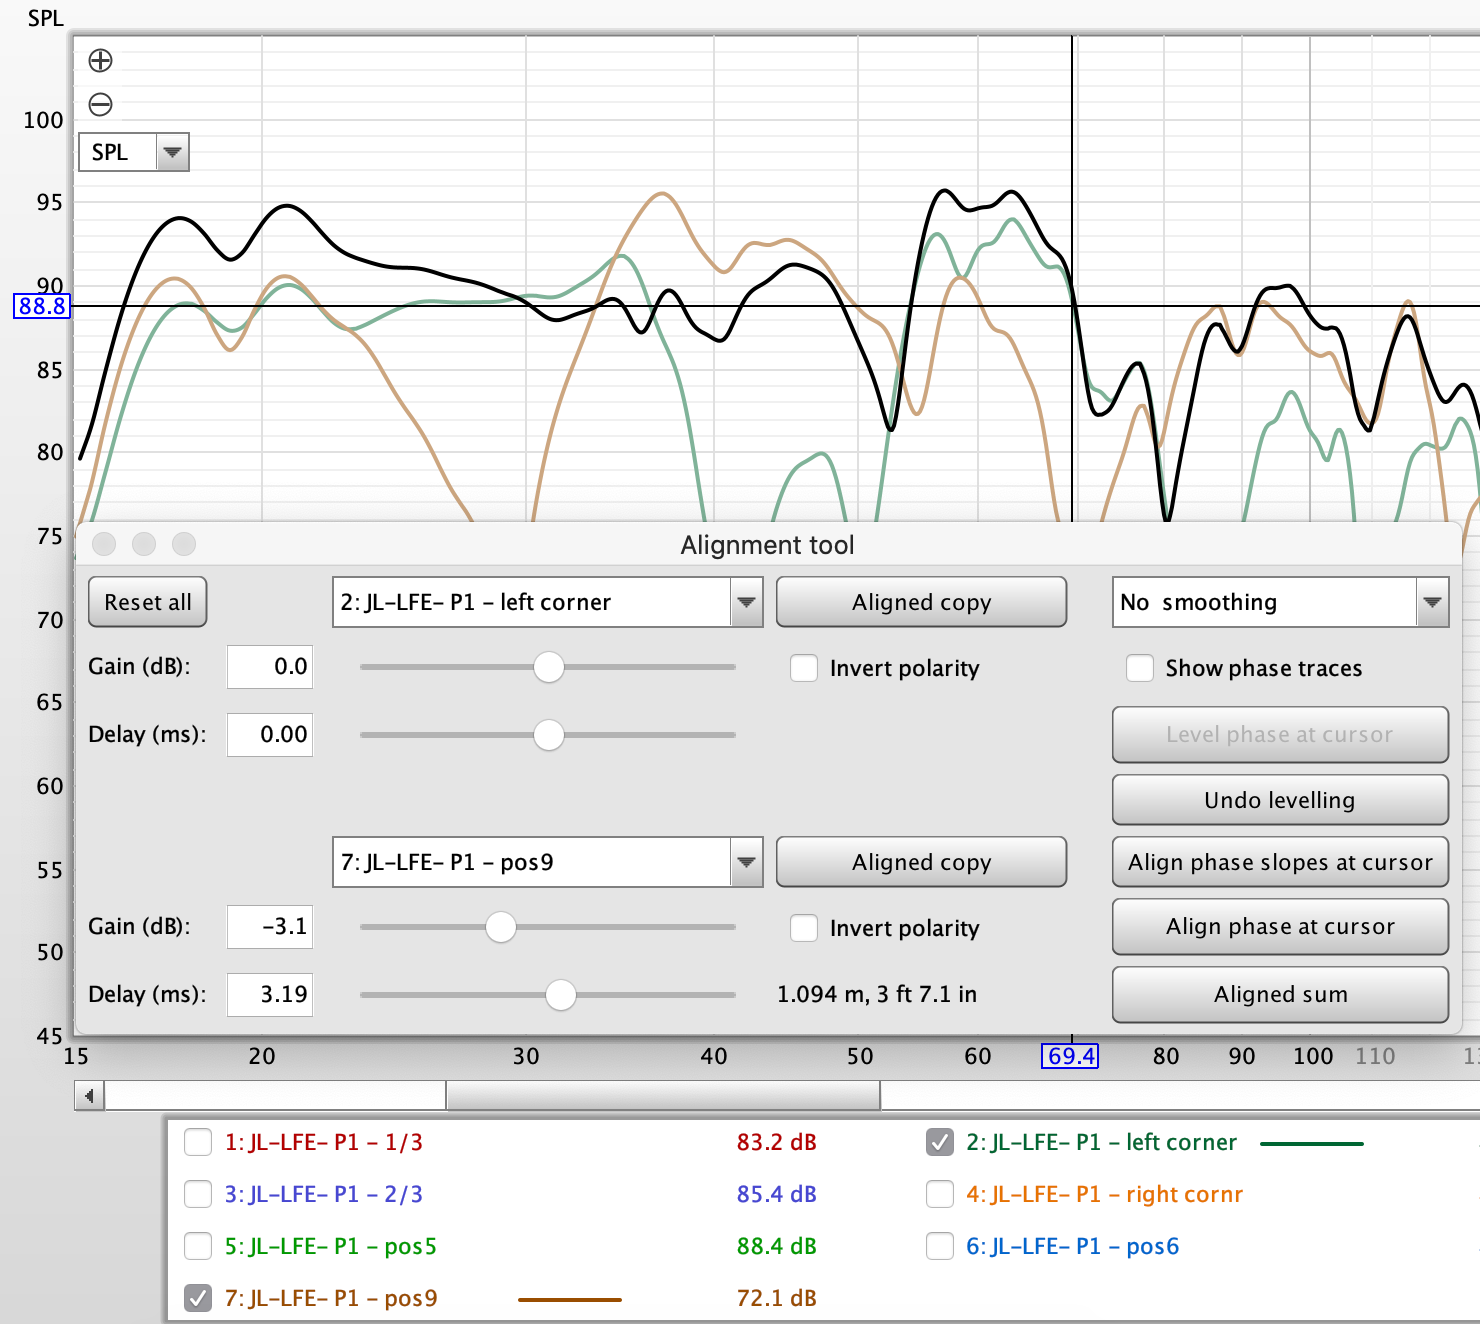
We can continue to try different positions...Lets try the left corner with Position 9 (rear)
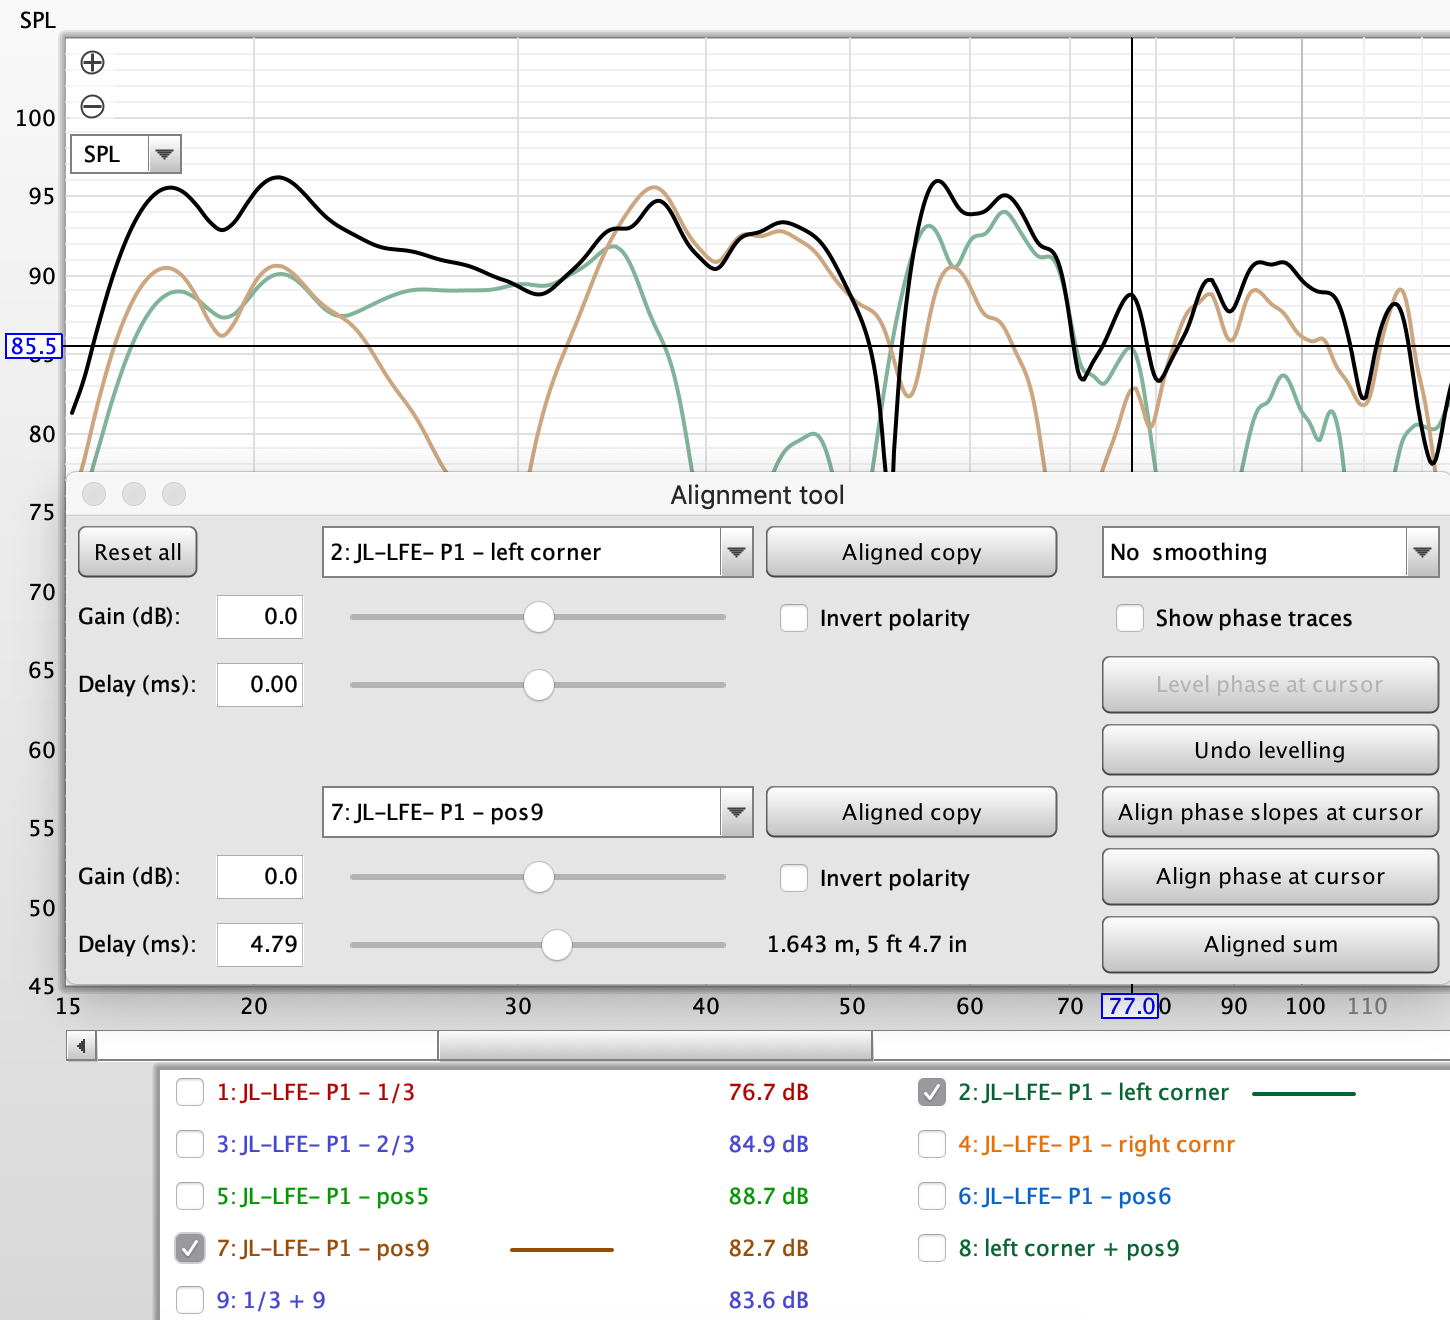
We can add the delay based on the distance. Also playing around can see variations around that.
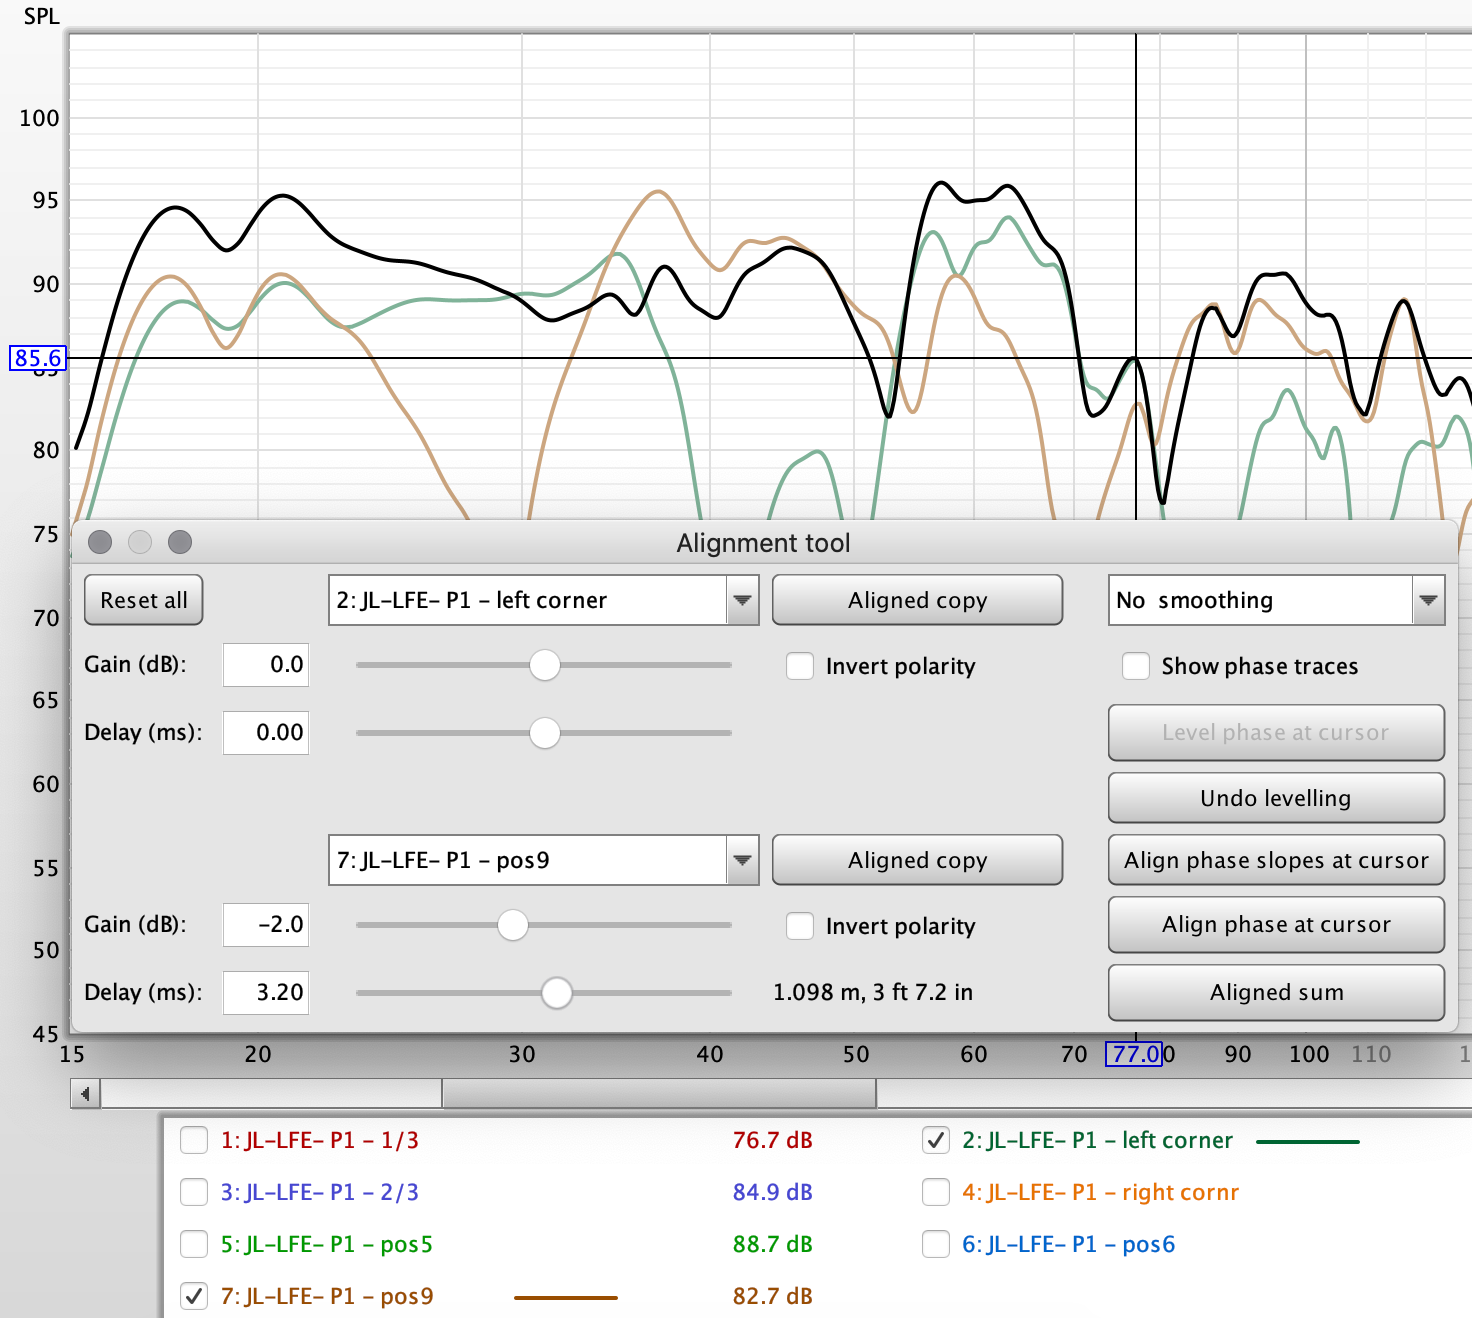
We can also adjust the gain of the subwoofers, such as lowering the rearward Position 9 subwoofer by -3dB yields a nice smooth house curve between 45Hz and 20Hz. In this scenario, maybe we'd just need to deal with the dip at 53Hz and EQ out the peak between 53Hz and 70Hz. While this is still not ideal, we're starting to find a solution that could be fairly smooth with light EQ.
Okay not big on the dip at 80Hz, but my mains could cross over at 70 or 60 just fine.
So as we work through scenarios, we can start to save some of these scenarios to compare against each other. To save the summations as a measurement, select Aligned Sum. You'll notice it gets added to the Measurement pane. I recommend renaming it to something easily identifiable.
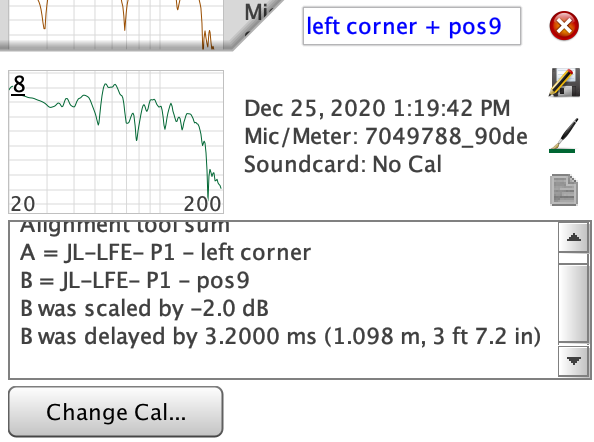
Go through and save the smoothest looking summations using the Align Sum tool.
Nothing is great here, although in many ways the 1/3rd and 2/3rd positioning we may be able to EQ that big lull - provided we have enough headroom. But what would happen if we did three subwoofers? Let's try taking the summation of the 1/3rd and 2/3rd positioning and aligning it with position 9.
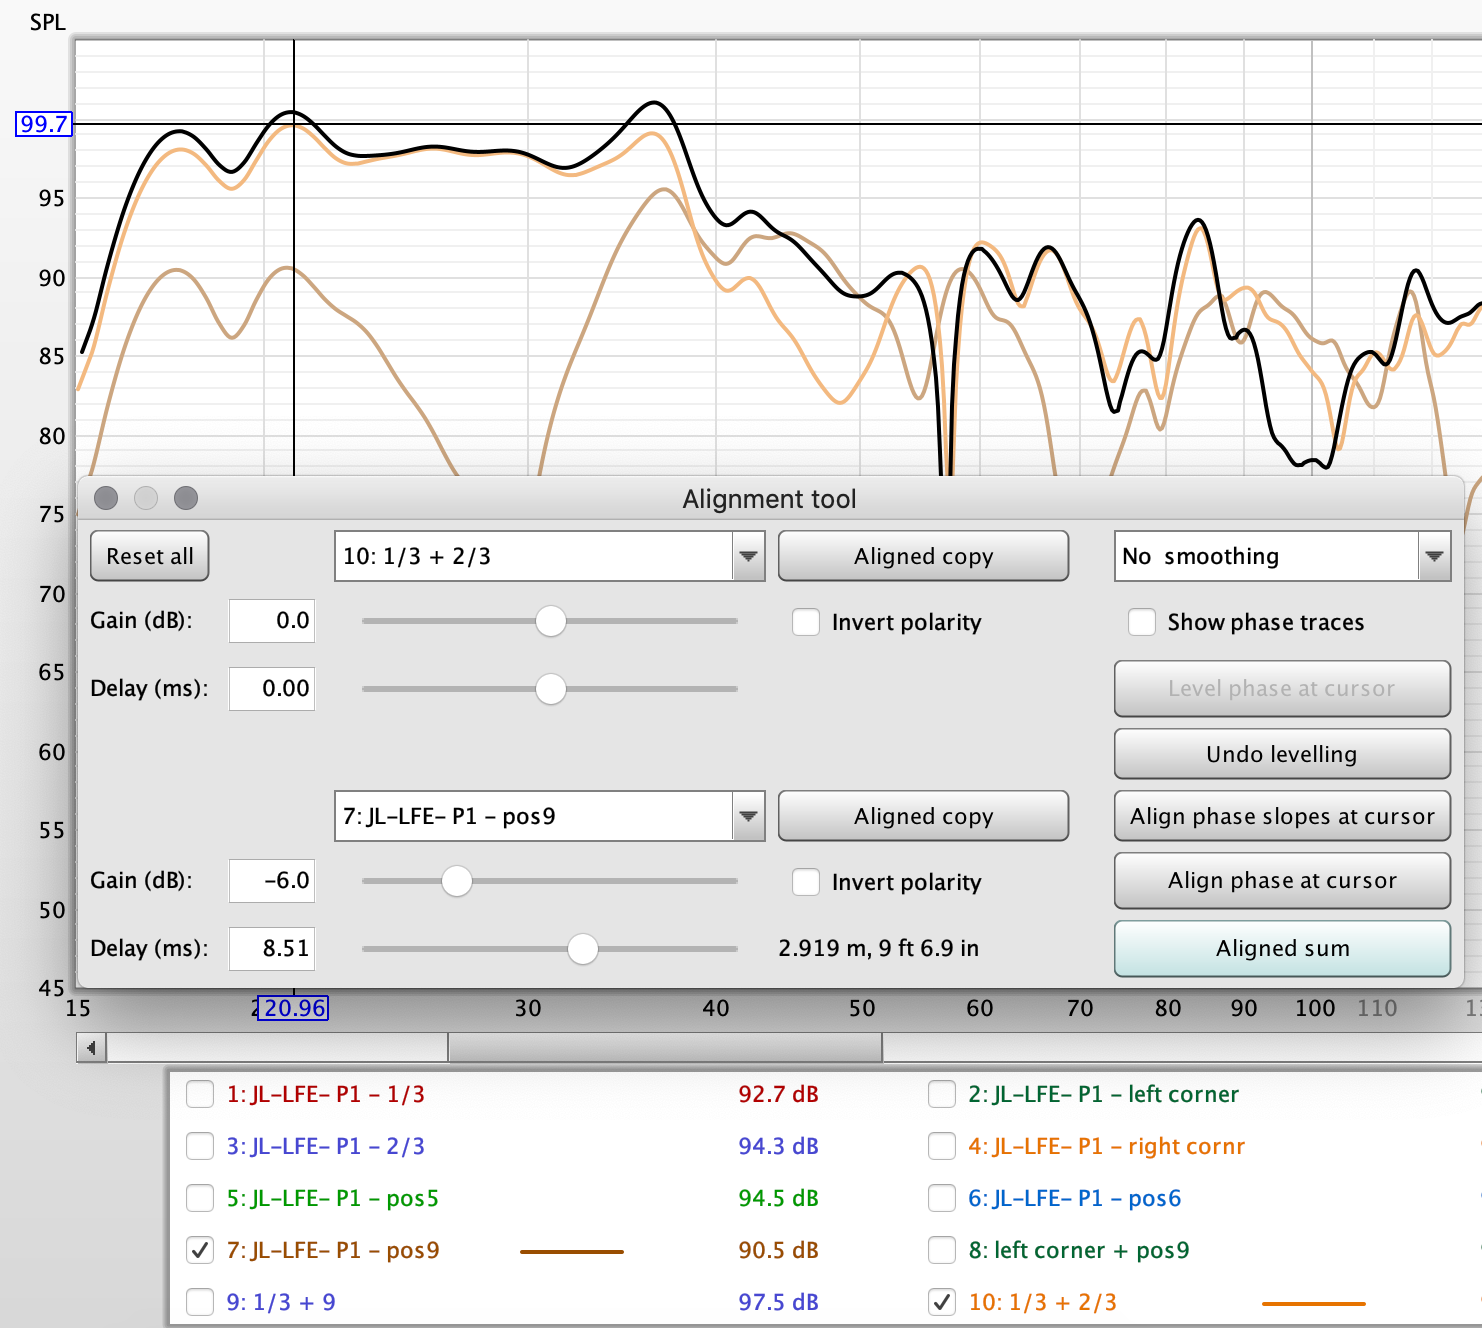
Notice that the gain of the rear subwoofer can be reduced quite a bit, -6dB in this case. That means it only needs 25% of the power as the front subwoofers! So potentially we can use a much smaller and more manageable subwoofer in that rear position.
Finally we can compare the four options we discussed here.
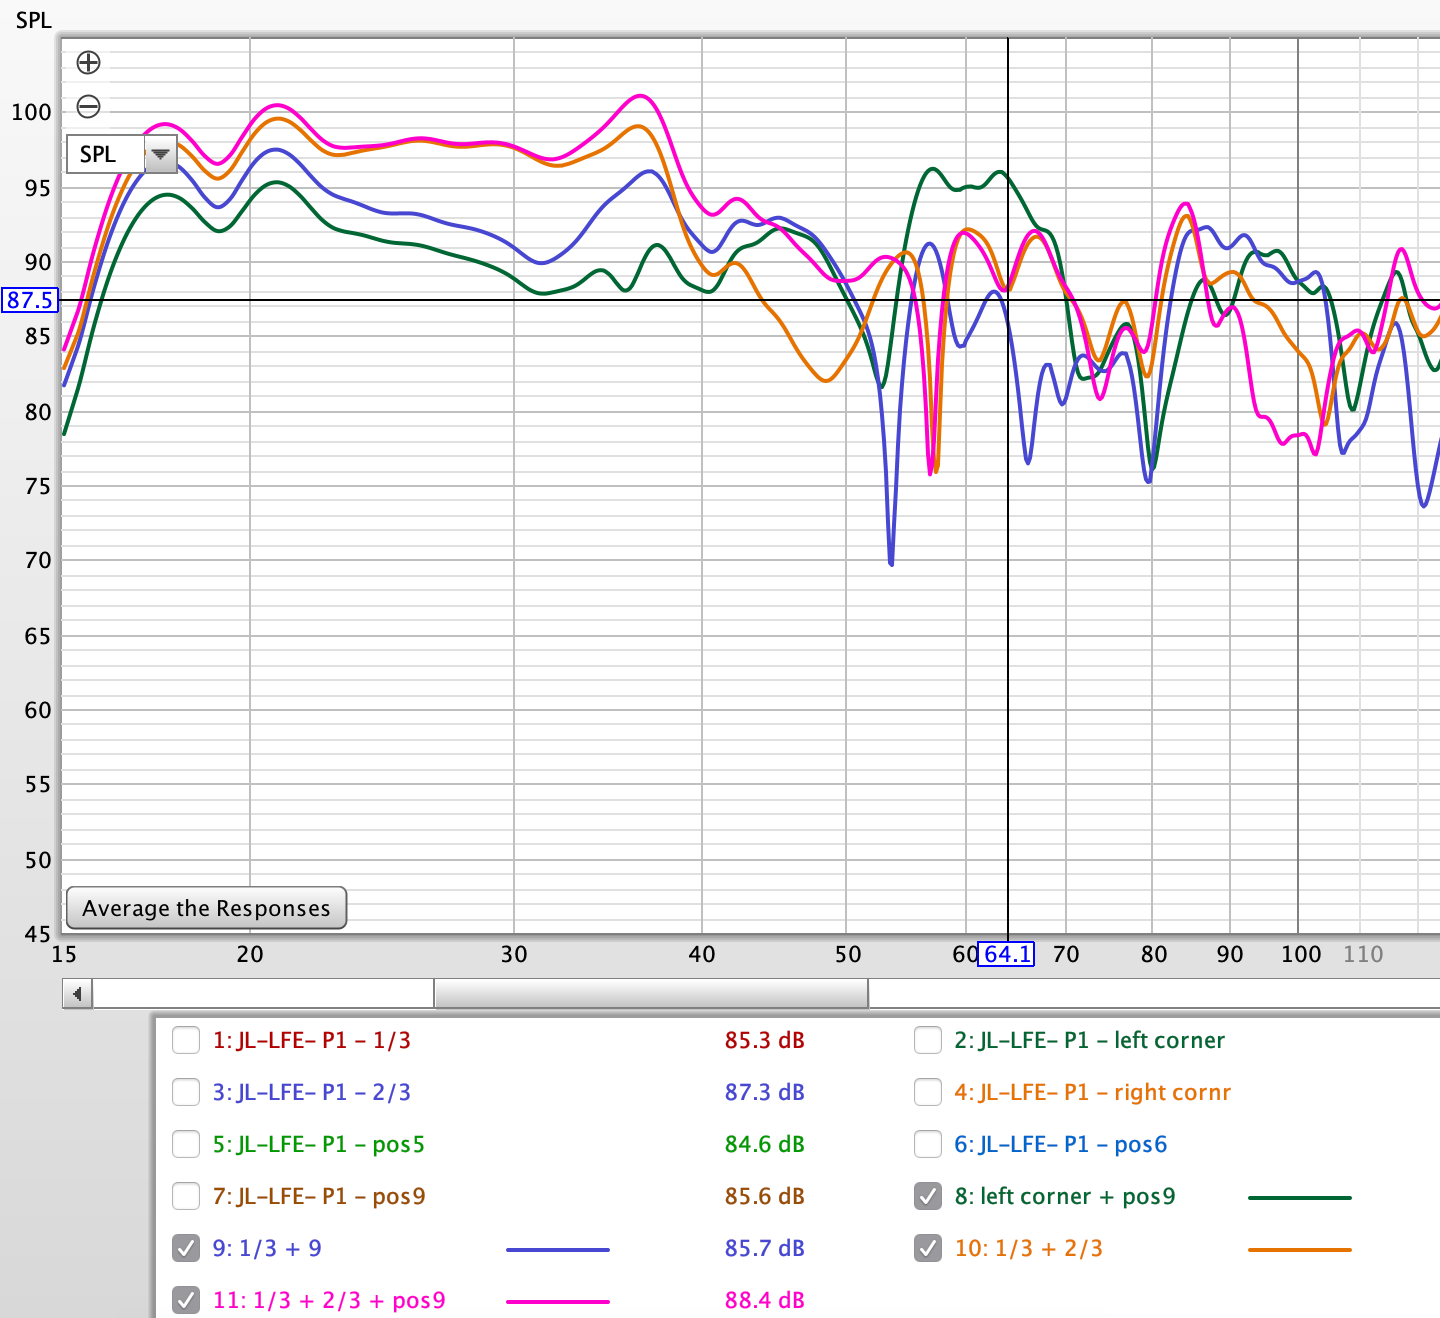
While the 1/3rd and 2/3rd wall dual sub placement is likely the best of the two sub options (provided headroom is available to boost that 40-50Hz null), the three subwoofer option is by far the smoothest response. This process can be continued with various location combinations selected. For this room smooth response in fact took four subwoofers.
For more details on delays and EQing multiple subwoofer applications, see Configuring Multiple Subwoofers Using REW & MiniDSP.